Updated: February 25, 2012
BTRFS, pronounced Butter FS, is a relatively new filesystem for Linux, based on Sun's ZFS, the one company behind most great UNIX-like inventions in the past 25 years, until devoured by Oracle. Never mind that. BTRFS is still considered unstable and thus not suitable for production environments. However, the filesystem comes with many useful features and capabilities that are worth exploring. One such is the ability to create snapshots of your system.
Let me elaborate. Snapshots are time-dependent system states. In a way, if you copy a file and create a backup, you essentially create a snapshot, relevant to the moment of copying. This can be done anywhere, anytime. But this is not a filesystem feature. Think of a filesystem that actually can managed multiple replicas of your files, within its own structure, and allow you to use them as you please. Sounds neat, let us explore.

BTRFS, intro
Before we dig in deeper, let me give you a short introduction on this filesystem. BTRFS is supposed to provide an answer to all software-level needs for disk and file management, for which purpose you would normally need additional tools. BTRFS allows defragmentation, load balancing, shrinking, growing, hotswap, RAID, subvolumes, snapshots, compression, cloning, and many other features, all built into the filesystem driver. With other filesystems, you would probably need many other drivers and user-land tools to manage these kinds of operations, like defragmentation tools, RAID drivers, LVM drivers, cloning software, and more. BTRFS has got it all built-in.
Built-in translates into performance and simplicity. At the moment, though, BTRFS is far from being usable, so it suffers from instability and reduced performance, compared to other filesystems, like Ext4. But this huge potential must not be ignored. And it needs to be studied.
In this tutorial, I will show you how you can manage snapshots. It's a super-wicked feature, which should let you backup your critical files before any change and then allow you to revert back if needed. In a way, it's similar to Windows system restore plus driver rollback, on the filesystem level. Coincidentally, you will also learn a bit more about using BTRFS than just snapshots from this article. Our test bed is a Fedora 16 Verne, KDE system.
How to manage BTRFS
You can use BTRFS for your root filesystem, excluding the /boot, which needs to be formatted with a traditional journaling filesystem. For the sake of simplicity, in this tutorial, we will work on a separate device, named /dev/sdb1, formatted with BTRFS and used on demand. For all practical purposes, it could be your /home or /data or anything else.

So what are we going to do?
We will take /dev/sdb1 and mount it. Then, we will create several subvolumes on it. Think of subvolumes as virtual root trees, so that any one can represent a separate, independent tree structure of data, even if the data is the same.
Here's the sequence of commands, don't panic, we will explain in a jiffy.
btrfs subvolume create /mnt/data
btrfs subvolume create /mnt/data/orig
echo "Dedoimedo is l33t" > /mnt/data/orig/file
btrfs subvolume snapshot /mnt/data/orig /mnt/data/backup
/dev/sdb1 is mounted under /mnt. We create the subvolume called data. Inside of it, we create another subvolume called orig. This is where our original files will be created. From the user perspective, subvolumes appear as NORMAL directories. In other words, data and data/orig are directories.
Next, we create a text file under orig called file, with some text in it. Finally, we create a snapshot of the orig subvolume and call it backup. Now, backup is an identical copy of our orig subvolume. Here's the proof:

Moreover, to verify, we will use the btrfs subvolume list command to see all subvolumes:
btrfs subvolume list

Notice the ID number for each subvolume. This is important, as we will soon use them.
Default view
At the moment, the default view under /mnt is the one that shows both orig and backup under data. We can change that. Remember my earlier mention of virtual root trees? Well, BTRFS lets you switch top view to any one of subvolumes.
So basically, using subvolumes and snapshotting back and forth means simply switching view to a different data tree. No need to delete files, overwrite or anything. You just shift to a different subvolume. Here's how it's done.
btrfs subvolume set-default ID is exactly what we need now. We will set our default view to one or another subvolume, we will then umount the device and mount it again. This is important!
Now, if you're working with a filesystem that cannot be unmounted because it is in use, like say /usr or /etc, you will have to reboot for the change to take effect, as the filesystem will be unmounted during shutdown and mounted on startup. Only a different subvolume will be exposed under a specific directory tree. The user will not see a difference, but the data contained inside the directories will have changed.
To actually see that this works, we will edit the file called file under backup. Instead of reading Dedoimedo is l33t, it will read Dedoimedo is NOT l33t.
echo "Dedoimedo is NOT l33t" > /mnt/data/backup/file
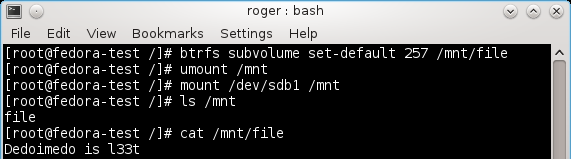
All right, we know the subvolume IDs. So let's mount ID 257 as default. This means that once we remount /mnt, we will see a file with its contents there.
btrfs subvolume set-default 257 /mnt
umount /mnt
mount /dev/sdb1 /mnt
And now we see the contents of file as it was originally:
We can now play with it, set-default, umount, mount, etc:
Above, we switch between 257 and 260 views, the orig and backup and we can see that the contents of the file have changed. We didn't do anything special, just exposed different subvolumes to the user.
Finally, if we want to see both orig and backup under data, we will restore the view to the top level subvolume, which is data. Now, please note that all data is going to show under /mnt. This is because we set the mount point there. We can use anything we want.

This is simply awesome!
And here's more fun.
Conclusion
The snapshot feature in BTRFS is quite neat. The usage is not that difficult, although you need to pay attention and focus a little so that you don't end up supposedly locking yourself outside your data and/or hunting for the correct data tree. But you are probably more confident now, as you now a handful of BTRFS commands, and there's also the btrfsctl utility for those who like their management tools to bear the ctl suffix.
Next week, we will test Snapper, a BTRFS management frontend, available in openSUSE, which allows this very same functionality using GUI. So for those of you afraid of the command line, we will see how things can be done graphically. That would be all.
P.S. The thumbnail picture on the index page taken and adapted from Wikimedia and licensed under CC-BY 2.0.
Cheers.