Updated: May 23, 2008; August 31, 2010
Oh, you're gonna love this article! Even though there are many websites hawking similar content, with varying degree of clarity and quality, I want to offer a short, easy-to-use guide to some of the most common yet highly useful commands that could help make your Linux experience more joyful.
Now that you have read some of my installation guides, you have probably setup your system and configured the basic settings. However, I'm positive that some of you must have encountered certain difficulties - a missing package, a missing driver. The initial effort required of a Linux novice can appear daunting, especially after many years of Windows discipline.
Therefore, this article was born, in order to offer simple solutions to some of the more widespread problems that one might face during and immediately after a Linux installation. It is intended for the beginner and intermediate users, who still feel slightly uncomfortable with meddling in command line, scripts or configuration files.
This article will refer to Ubuntu Linux distribution as the demonstration platform. However, all of these commands will work well with many other Linux distributions, with only small changes in syntax, at most. I have personally tested and used all of the commands and configurations in both Debian-based and RedHat-based distributions with success.
What am I going to write about?
Here are the topics. If you want to skip through some of the paragraphs, you can use the table of contents further below, but I recommend you read everything.- Basic tips - avoiding classic mistakes.
- Commands - an introduction to the command line.
- Installation of software - including extraction of archives and compilation of sources.
- Installation of drivers - including compilation, loading, configuration, and addition of drivers to the bootup chain, writing of scripts and addition to the bootup chain.
- Mounting of drives - including NTFS and FAT32 filesystems and read/write permissions.
- Installation of graphic card drivers - including troubleshooting of stubborn common problems.
- Network sharing - how to access shared folders in Windows and Linux from one another.
- Printer sharing - how to share printers in Windows and Linux from one another.
- Some other useful commands.
Table of contents
- Basic tips
- Commands
- Installation of software
- Installation of drivers
- Mounting a drive
- Installation of graphic card drivers
- Network sharing
- Printer sharing
- Other useful commands
Basic tips
There are some things you need to know before heading into the deep waters of the Command Line:
- Linux commands are cAse-sensitive (dedoimedo and Dedoimedo are two different files).
- It is best to create folders and files in Linux WITHOUT spaces. For example: Red Gemini.doc is a valid Windows filename, but you might have problems accessing it from the command line in Linux; you should rename the file to RedGemini.doc. Users of the DOS command line are also familiar with this problem - commands will fail on folders and files with more than a single word, unless explicitly declared with double quotation marks ("like this").
- Pressing TAB when typing a command will auto-complete the command. For example: if you have a single file in a certain folder that begins with the letter p, typing p then TAB will automatically complete the name regardless of its length; if you have more than one file, the command will complete the maximum available part of the string that matches all relevant filenames (s + TAB for smirk and smile will auto-complete to smi).
- Before copying, moving, deleting, or tweaking any file, especially scripts and configuration files, it is best to back them up first.
- Do NOT stop the commands while they are running (by pressing Ctrl + C). Even though you may not see the HDD light blinking and the execution takes a very long time, do not assume the system is frozen. Unlike Windows, Linux almost never gets stuck. Let the command complete, be it 5 seconds or 5 hours. Just for reference, compilation of certain programs can take a few days to complete.
Commands
To be able to use the command line, you need to be familiar with some rudimentary Linux commands. Former users of DOS will find the transition very simple. Below you can find links to some of the basic Linux commands:
Alphabetic Directory of Linux Commands
An A-Z Index of the Linux BASH command line
Asking for help
First, anything and everything you could ever probably think of has already been answered at least once in a Linux forum; use the forums to find solutions to ... everything. Copy & paste your error code / message into a search engine of your choosing (e.g. Google) and you will find links to answers in 99.9996532% of cases.
Locally, help is one of the most useful features available to the command line user. If, for some reason, you cannot figure out the syntax required to use the file, you can ask for help. There are two ways of doing it:
The above usage will display a full help file for the command in question in Vi text editor. You can learn more about Vi from An Extremely Quick and Simple Introduction to the Vi Text Editor.
The above usage will display a summary of available options for the command in question, inside the command line terminal. You will most likely prefer to use this second way.
Installation of software
Although most Linux distributions offer a wealth of useful programs, you will probably be compelled to try new products. Some programs will be available for download via package managers, like Synaptic. Others will only be found on the developer's site, most likely packaged inside an archive.
You probably ask yourself: What now? The answer is very simple. There are three versions to your downloads, from the easiest to hardest:
- Compiled packages, usually with .rpm or .deb extension. These packages are identical to Windows .exe installers and will unpack and install automatically. The upside of the packages is the relative use of their deployment; the downside is that the user has no control over the installation script.
- Compiled archives, called tarballs, with .tar extension. These archives will contain all of the necessary files required to make a program run, but the user will have to install them manually, from the command line, after unpacking the archive. These archives will also most likely be compressed and bear a double extension like tar.gz or tar.bz2. This option offers more control during the installation.
- Sources, usually archived. The user will have to unpack the archives and then compile the sources before being able to actually install the program. In addition to better control of the installation, the user will also benefit from software optimized to his hardware configuration.
What should you choose?
The logical choice for the novice user should be 1 > 2 > 3. Intermediate users will probably try 2 > 3. Geeks will most likely ever only compile from sources.
Discipline
This may sound harsh or strict, but certain unspoken rules are followed, which simplifies the use of software downloads.
- The program itself will almost always be accompanied with a how-to, usually in a form of a text file that explains what a user should do, prior, during and after the installation. The how-tos are most often found on the site you download the software from, either as a standalone file, an explanatory text on the download page or bundled with the download.
- You should read this how-to FIRST before downloading / manipulating the software.
- A secondary how-to will most often be packed with the program, explaining the installation process itself.
- You should read this how-to FIRST before installing the software.
Unpacking an archive
The exact syntax will differ from one package to another. But the general idea is the same for all. The only difference will be in the arguments used for unpacking. Here are a few common examples:
You can read in detail about the handling of tarballs on the Wikipedia site.
Zipped archives
Some archives will be zipped rather than tarred. This might put you off. But the problem is easily solvable. If you recall, we have the ability to "ask" for help for each unknown command. In our case, we need to know how to unzip an archive.
Here's a screenshot I took, depicting the very dilemma we are facing - and its solution:
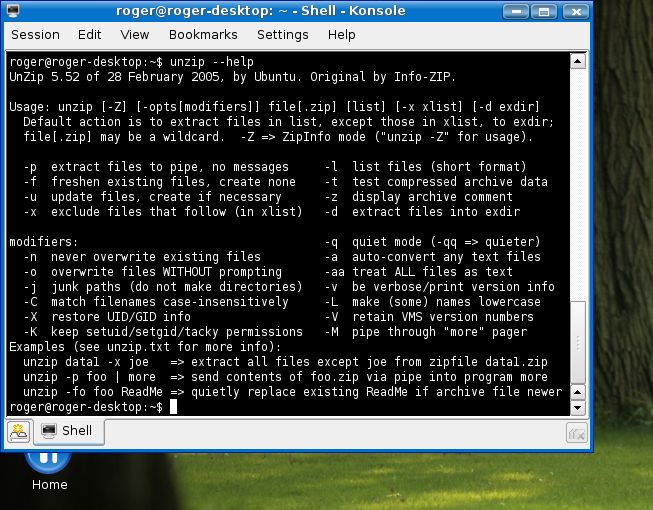
A possible usage will then be:
Reading from the help screen above, we want to unpack our archive into a folder. The argument -d tells us that the contents of the archive will be extracted into a destination directory (folder), in our case a temporary folder called /tmp.
Installation
After unpacking the archive, you will now have to install the software. Usually, the installation is invoked by using a script. The exact name of the script will vary from one program to another, as well as its extension, depending on the language used to write it.
For example, the following command will invoke the script named install.pl (written in Perl). Dot and trailing slash indicate that the script will be executed within the current directory.
Compilation (from sources)
Sometimes, the programs will not be compiled and ready to install. The archives will contain lots of files with curious extensions like .c, .h and .o. If you are not a programmer, you should not bother understanding what they are and what they do. Likewise, you need not understand how the compilation of sources is made. You just need to remember three simple commands:
This first command will generates files required to build the software and setup system-wide parameters.
This second command will build the libraries and applications.
This third command will install the libraries and applications.
For homework, you could use some reading:
Compiling and installing software from source in
Linux
There is no guarantee that the compilation will succeed. Some sources are broken! In that case, you should make note of the errors and post them in relevant forums, where you are most likely to find an answer rather quickly.
Summary of installation procedures
To make things easier to understand, below are two examples showing the list of necessary commands required to run to successfully install a downloaded application (please note these are ONLY examples!). Most likely, you will need root privileges (su or sudo) to be able to install software. An archive containing compiled program:
OR
tar -xjf some_software.tar.bz2
cd some_software_directory
./install_script
An archive containing sources:
OR
tar -xjf some_software.tar.bz2
cd some_software_directory
./configure
make
make install
Installation of drivers
Drivers are programs, like any software. The only difference is - you do not actively use them. They serve the purpose of making your hardware components understand each other. As simple as that. You need them to enhance your usage of the operating system.
Most often, the necessary drivers will be included with the distribution and installed during the setup. Sometimes, you might not be so lucky and will reach a newly installed desktop without sound, network or video drivers.
I will not go into details explaining how specific drivers are installed. You should contact your vendors for that information. I will explain how to install the drivers, how to load them, and then how to add them to startup, so they will load automatically every time your machine starts.
Installation
Just like any software, drivers may be compiled or not. Most often, they will not be. Drivers will usually be distributed as sources, in order to achieve maximal possible compatibility with the hardware on the installation platform. This means you will have to compile from sources. Piece of cake. We already know how to do that.
If the vendor is benevolent, it is possible that the driver will be accompanied with a self-installation script. In other words, you will need to run only one command, which will in turn extract the archive, compile, install, and load it. But this might not be the case - or might not even work. I have personally witnessed a driver self-installation script go wrong. Therefore, for all practical purposes, you should probably manually install the driver.
After successfully extracting the archive and compiling the sources (./configure, make, make install), you will most likely be faced with three choices:
- The driver will be fully configured and copied to default directories and the system paths updated. You will not need do anything special to use the driver.
- The driver will be auto-configured and the system paths updated. This means you will only have to add the driver name to the list of drivers loaded during the boot to enable it every time the machine starts.
- The driver will be ready to use, but will not be configured nor system paths updated. You will have to manually load the driver and then update the list of drivers loaded during the boot to enable it every time the machine starts.
The second option will make the installation process probably look like this:
OR
tar -xjf some_driver.tar.bz2
cd some_driver_directory
./configure
make
make install
Optional
./setup_driver_script
All that remains is to add this driver to the list of drivers loaded at bootup. In Linux, the drivers are often referred to as modules.
You need to open the configuration file containing the list of modules. You should refer to your specific distribution for exact name and location of this file. In Ubuntu, the file is called modules.conf and is found in /etc directory (/etc/modules.conf). We will update this file, but first we will back it up! Please remember that you need root privileges to meddle with the configuration files.
This is what our procedure would look like:
gedit /etc/modules.conf
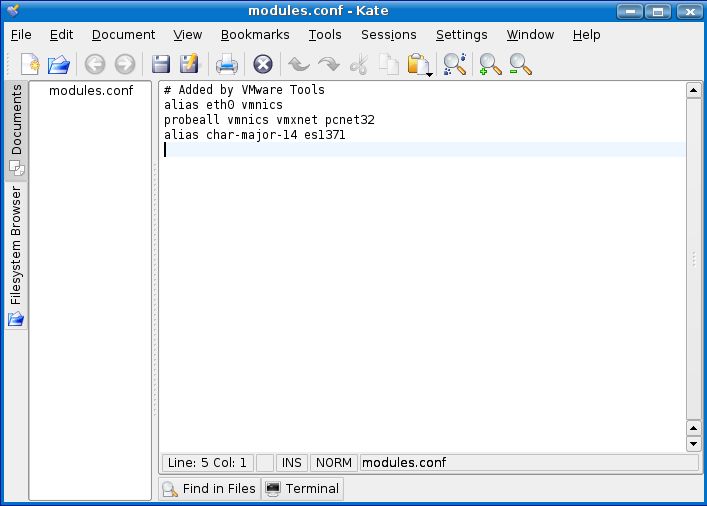
The above commands will open the file modules.conf inside the gedit text editor. Simply add your driver in an empty line below the existing drivers, save the file, exit the text editor, and reboot for the change to take effect. That's all!
Here's an example of a modules.conf file for a Kubuntu Linux, installed as a virtual machine. To add a new driver, we would simply write its name below the existing entries. Of course, you need to know the EXACT name of the driver in question.
The third option is a bit more complex.
Loading drivers
You have successfully compiled the driver, but nothing has happened yet. This is because the driver is not yet enabled. Looking inside the directory, you will notice a file with .ko extension. This is your driver and you need to manually load it.
We need to install the driver into the kernel. This can be done using the insmod command.
insmod driver.ko
After the driver is loaded, it can be configured. To verify that the driver is indeed present, you can list all the available modules:
If by some chance you have made a terrible mistake and you wish to remove the driver, you can use the rmmod command:
Configuration of drivers
Configuring the driver requires a bit of knowledge into its functionality. Most often, instructions will be included in the how-to text files.
Below, the example demonstrates how the network card is configured after the network driver is loaded. The network card is assigned an identifier and an IP address. In this particular case, eth0 was the selected device name, although it could be also eth1, eth2 or any the name. The assigned IP address tells us the machine will be part of a LAN network.
After a reboot, you will realize that you no longer enjoy a network connection. This is because your driver has not been created in a common default directory and the system does not know where to look for it. You will have to repeat the entire procedure again:
insmod driver.ko
ifconfig eth0 192.168.0.9
You now realize that an automated script would be an excellent idea for solving this problem. This is exactly what we're going to do - write a script and add it to bootup.
Scripts
Like in DOS and Windows, scripts can be written in any text editor. However, special changes are needed to separate between text files and scripts. In the Windows department, simply renaming the .txt extension to .bat will convert the file to a script. In Linux, things are a bit different.
Linux command line lives inside a shell - or more precisely Shell. There are several Shells, each with a unique set of commands. The most common (and default) Linux Shell is the BASH. We need to add this information to our script, if we wish to make it communicate with our Shell. Therefore, the above commands + Shell addition will make the following script:
cd driver_directory
insmod driver.ko
ifconfig eth0 192.168.0.9
We can also make it shorter:
insmod /home/roger/driver_directory/driver.ko
ifconfig eth0 192.168.0.9
Now, we have a script. Or rather a text file that contains the relevant commands. We need to make it into an executable file. First, we need to save the file. Let's call it network_script. To make the script executable:
Now we have a real script. We need to place it in the /etc/init.d directory so that it will be run during bootup.
And finally, we need to update the system, so it will take our script into consideration.
After you reboot, you will realize that your driver loads automatically and that your network card is configured! Alternatively, it is possible that the make install of the driver will place in the default directory:
Or you could place the driver in this directory by yourself. This way, you will be able to avoid the step of writing the script. However, my method, even if not the most elegant one, has one advantage: Drivers that you have manually compiled and placed into the default directories will be lost every time you update the kernel. This means you will have to reinstall them again after every such update. My method un-elegantly escapes this problem.
Mounting a drive
If you run a dual-boot system, it is entirely possible that you have installed your Linux before you have formatted all the Windows drives. This means that some of these drives might not be mounted - or accessible - when you're booted in Linux. Alternatively, you might have formatted the drives, but you have resized and relettered and renamed the partitions and they are no longer recognized by Linux. Furthermore, you just might be unlucky and your Linux refuses to see the drives despite your best efforts. Finally, you might be able to see them, but you cannot write to the NTFS drives and this irks you so. Compared to the above tasks, mounting drives is a simple job.
To be able to do this correctly, you need to know how your drives are ordered and what they are called, both in Windows and Linux. This requires that you be able to correlate between Windows partitions (E:\, G:\, K:\ etc.) and Linux partitions (hda1, hda4, hdb2 etc.).
First, make sure you know the order of your partitions in Windows. Then, when booted in Linux, list the Partition Tables:
The above command will display all the available partitions on your system. In this example, you see only the Linux partitions present, but there might be other (Windows) partitions.
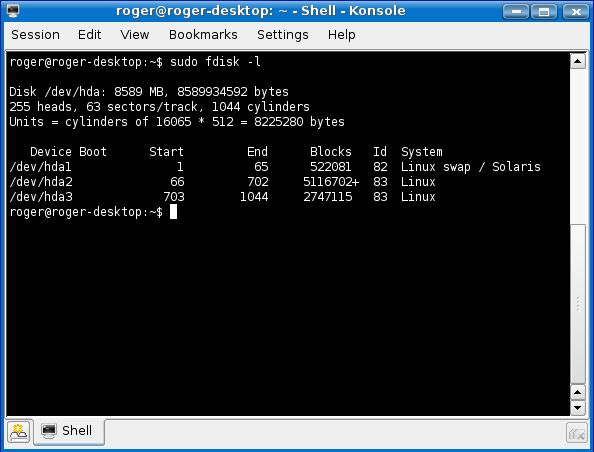
For the sake of this exercise, let's assume that Linux partitions are hda4-6, while Windows partitions are hda1-3.
Namely:
- hda1 will be Windows C:\ drive.
- hda2 will be Windows F:\ drive - also called Data.
- hda3 will be Windows G:\ drive - also called Games.
- hda4 will be Linux swap / Solaris.
- hda5 will be Linux (your /root).
- hda6 will be Linux (your /home).
Now, before you mount a drive, you need to create a mount point. This is most conveniently done by assigned a directory within the /media directory. For example:
The name data is arbitrary, but it can help relate the mounted drive to its Windows designation. Now, we need to mount the drive that corresponds to data. In our case, this is hda2.
There are several ways of mounting the drive. By default, NTFS partitions are mounted as read-only, although write access can also be enabled. FAT32 partitions are writable by default.
Like before, mounting the drive only once will hold valid for the current session. After reboot, the changes will be lost. Therefore, we need to add the mounting of the relevant partitions to the boot chain. The configuration file that holds this crucial information is called fstab and is located under /etc (/etc/fstab).
Therefore, in order to mount the NTFS drive (Windows F:\ drive called data) as read-only we need to:
- Create a directory called data within /media.
- Backup fstab.
- Add a new line to the fstab file - that will mount the NTFS drive hda2 (Windows F:\ - data) as read-only.
cp /etc/fstab /etc/fstab.bak
gedit /etc/fstab
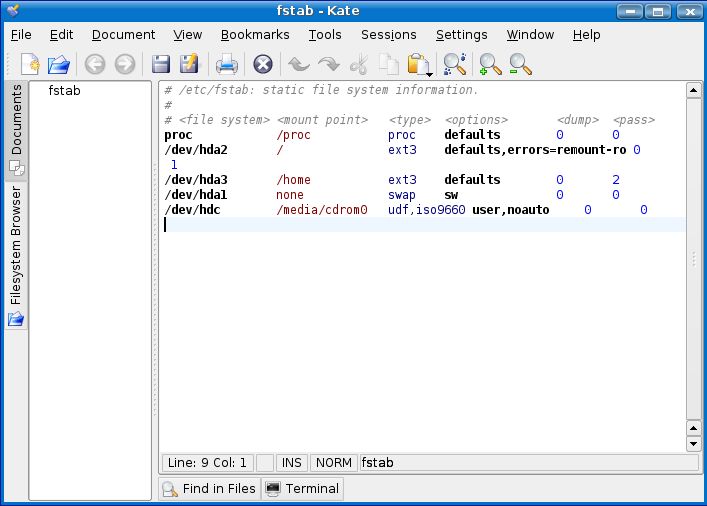
After opening the file in the text editor, we need to add the mount command. NTFS read-only:
The necessary commands, as well as procedures are well-documented in the Unofficial Ubuntu 6.10 (Edgy Eft) Starter Guide. Here, you can see the sample fstab file inside Kate text editor, for Kubuntu Linux.
Other options
Alternatively, if you have partitions formatted with FAT32 file system or you wish to be able to write to NTFS partitions from within Linux, you can use the following commands:
FAT32 read/write:
NTFS read/write - requires installation of software that can write to NTFS drives.
An exercise: Let's assume we wish to be able to write to NTFS partition C, read-only NTFS partition F and use FAT32 partition G. In that case, the list of commands that we need to execute is:
mkdir /media/windows
mkdir /media/data
mkdir /media/games
cp /etc/fstab /etc/fstab.bak
gedit /etc/fstab
ADD FOLLOWING LINES TO FSTAB
/dev/hda1 /media/windows ntfs-3g defaults,locale=en_US.utf8 0 0
/dev/hda2 /media/data ntfs nls=utf8,umask=0222 0 0
/dev/hda3 /media/games vfat iocharset=utf8,umask=000 0 0
Installation of graphic card drivers
Please note that commands used in this subsection are for Nvidia drivers ONLY - I have several computers, ALL of which have Nvidia graphic cards - but some of the solutions presented work for both Nvidia and ATI cards.
Although I have already discussed the installation of graphic card drivers in my Installing SUSE Linux and Installing Kubuntu Linux articles, I think a bit of extra guidance will not hurt anyone.
Basically, you can install the graphic card drivers using a Package Manager or via the command line. For most people, the first method should work flawlessly. The first method is embodied in these two commands - the download of the required package and the installation of the driver:
nvidia-glx-config enable
Some people might prefer to install the drivers manually, with the X Windows stopped. To do this, you literally need to stop the desktop from running.
OR
/etc/init.d/kdm stop
OR
/etc/init.d/xdm stop
The desktop should vanish and be replaced with a command line. You will probably need to login. It is possible that you will only see a black screen and no command prompt. Do not be alarmed! Linux operating system usually has 7 virtual consoles. The first six consoles provide a text terminal with a login prompt to a UNIX shell. The 7th virtual console is used to start the X Windows.
In other words, it may occur that by stopping the X Windows you will have simply switched off the graphics AND remain in the 7th virtual console, therefore having no command line to work with. All you need to do is switch to one of the text consoles by pressing Alt + F1-6 on the keyboard. Now, you need to install your driver:
After the installation is complete, you should simply restart the X Windows.
OR
/etc/init.d/kdm start
OR
/etc/init.d/xdm start
If you see an Nvidia splash logo, it means the driver has been successfully installed. Reboot your machine just to make sure. This is where you might encounter a problem.
Instead of the Nvidia logo, you will see an error message indicating that the X Server has been disabled and that you need to manually edit the settings in the xorg.conf file before being able to proceed to the desktop. Now, there are many possible reasons for such an error and trying to provide a general solution is impossible.
However, I have found the following argument to hold true for many cases: If you have setup your Linux distribution using the GUI installer, you will have probably used the default configurations and the generic kernel will have been installed. I this case, sometimes, the built-in Nvidia driver (nv) might interrupt with the installation. There are two methods for solving this problem.
Method 1: Alberto Milone's envy package
Envy is a command-line application that will download the latest drivers for your card, clean up old drivers and install the new ones. Instructions for the usage can be found below the download links.
Method 2: Do it yourself
First, download the required driver. Then, execute the following commands:
The offending built-in driver needs to be disabled.
Change the last line to DISABLED_MODULES="nv". This will prevent the built-in driver from loading and interrupting with your own installed driver.

Now, you should remove all conflicting files from your system:
apt-get --purge remove nvidia-glx nvidia-settings nvidia-kernel-common
rm /etc/init.d/nvidia-*
After the offenders are removed, you should install the drivers from the command line:
sh NVIDIA-<DRIVER VERSION>.run
nvidia-xconfig --add-argb-glx-visuals
/etc/init.d/gdm start
Again, you should see the Nvidia splash logo. Reboot just to make sure there are no more surprises. This should get you up and running with the latest graphic card driver.
Network sharing
If you have more than one computer, you are probably sharing resources among them.There is no reason why you should not continue doing this if one of the machines is running a Linux distribution. Sharing can be accomplished in many ways. Perhaps the simplest is using Samba server. First, install Samba:
After the Samba server is installed, you will need to edit a few options in the configuration file to allow sharing privileges.
gedit /etc/samba/smb.conf
In the configuration file, you will need to setup a number of parameters:
- workgroup = workgroup_name - the name of the Workgroup for your LAN (e.g. HOME)
- netbios name = netbios_name - without spaces; computer alias by which you will be able to call it across the network
- security = user
After saving the configuration file, you will have to restart the Samba server:
Now, select a folder that you wish to share.
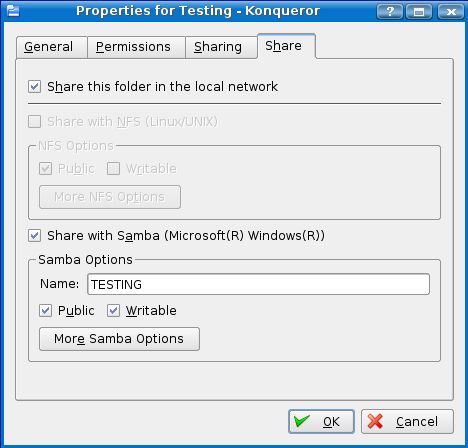
If you have ticked the option Writable, you will be able to modify the contents of this folder. Finally, to be able to connect to this share from Windows, you will have to create a Samba user:
Under 'name' you should specify an existing UNIX user (e.g. roger). Do not forget the apostrophes! You will be asked to create a password. And finally, restart the Samba server again, for the changes to take effect. Now, the sharing itself. Very simple.
Windows > Linux
When asked for username and password, provide the Samba user name, e.g. roger and the relevant password. And that's it. Browse to the shared folder. If the shared folder is writable, you will be able to modify the contents.
Linux > Windows
Press Alt + F2. This will bring up the Run Command window. In the Command line, specify the IP address or the name of the computer that you wish to connect. You can see an example below:
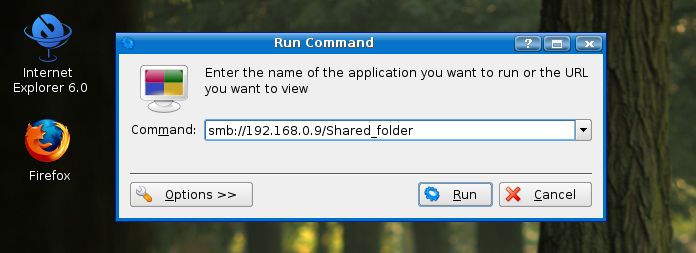
And that's it. Easy peasy lemon squeasy!
Printer sharing
Well now, folder and file sharing is really easy. What about the printers? Again, it is very simple. If you have a printer installed on a Windows machine, accessing it from a Linux machine will be easy. The rougher side of the coin is accessing a printer installed on a Linux machine from a Windows machine.First, you will have to allow your printer to be shared. Backup and then edit the Common UNIX Printer System configuration file.
gedit /etc/cups/cupsd.conf
In the file, search for the entry #Listen 127.0.0.1:631 and add or change as follows:
xxx.xxx.xxx.xxx:631 OR *:631
Listen /var/run/cups/cups.sock
CUPS listens on the port 631. If you use a static IP address for the Linux machine, you can specify only that IP. Otherwise, you might need to use a wildcard. Of course, you should be aware that an open port means a wee less security than before, so keep that in mind. After saving the changes, you will have to restart CUPS:
Now that the printer is available, you will have to add it for the Windows machine.
File > Add Printer
... A network printer, or a printer attached to another computer ...
... Connect to a printer on the Internet or on a home or office network ...
http://xxx.xxx.xxx.xxx:631/printers/printer_name
OR
http://netbios_name:631/printers/printer_name
When prompted for the driver, either select from a list or install it from a disk (like CD). And that's it! You can now print from a Windows machine on a printer connected to a Linux machine.
Tip: If you are using a Lexmark printer, you will probably not be able to find the right Linux drivers for your printer. Worry not! Using generic drivers for Hewlett Packard printers will work remarkably well.
Other useful commands
Here's a tiny sampling of some other useful tools that you might want to know. Be aware that the commands are presented in a generic way only. A variety of options (switches) can be used in conjunction with many of the commands to make their usage far more complex and effective.
Switching between runlevels
OR
telinit 0-6
Backing up the X Windows configuration file
Sometimes, you may need or want to configure the X Windows manually:
Display system environment information
You can use the cat (concatenate) command, which will print the contents of the files into the terminal. To display the CPU parameters:To display the memory parameters:
To find the version of your kernel and the GCC compiler:
Furthermore, to find out the version of your kernel:
Listing information about files and folders
This command is the equivalent of the DOS dir command.
To display hidden files as well (starting with dot).
Kill a process
Sometimes, you may start an application ... only it does not really start. So you try again. But this time, your distro informs you that the process is already running. This can also happen in Windows. Sometimes, processes remain open and need to be killed. Before you can kill a process, you need to know its ID. The command below will list all running processes:
Then, kill the offending process by its ID.
Alternatively, you can kill a process by its name. The below command will terminate all processes with the corresponding name (or names).
Conclusion
Well, that's it, for now. Hopefully you have learned something.
If you have had problems with your software installations, compilation from sources, drivers, partitions, and sharing, this article may have helped you overcome some of the problems. Personally, the above tips cover about 90% of tasks that a normal user would have to confront as a part of his/her daily usage. Isn't Linux so much fun? Well, have fun tweaking.
P.S. If you find this article useful, please support Dedoimedo.
Cheers.