Updated: June 27, 2011
It has been a while since I wrote my original Free imaging software tutorial, which covered the use of CloneZilla and PartImage software. Moreover, the article focused on the backup part only.
Today, I'd like to refresh and improve the tutorial. I will show you both how to backup and restore an operating system, including special emphasis on choosing the right device, GRUB bootloader and MBR restoration and other important, delicate elements of the procedure. We'll do it both with Linux and Windows systems. The two guides, the original and this one, should be the definite source for using CloneZilla imaging software smartly and wisely.

Linux system
Backup
I will not elaborate too much on the need for backup or the imaging technology details. You can find these in the original tutorial. The one thing I'd like to emphasize is you can never be too careful when working with your data. If you are not full confident about what you're doing, then don't. You may inadvertently ruin your disk, system or personal files. Now that you have the right amount of fear and respect in your bones, let's.
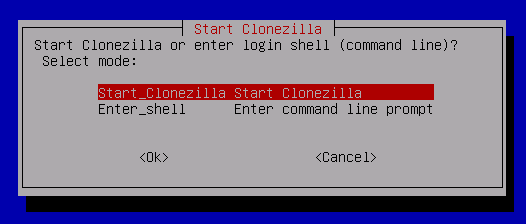
After launching CloneZilla, you will need to choose what mode you want to run the software. Shell is for experienced users who can type in commands manually or remember backup and restore options by heart. The first option is a guided wizard.
First important step. You need to choose the device you want to save your images to. This is the target or the destination, officially known as CloneZilla image repository. This device can be an internal or an external device. The device has to have a valid partition table and partitions need to be formatted with a supported filesystem, including Ext2/3/4 or even NTFS. For more about notations, please check my GParted tutorial.

Choose the directory.

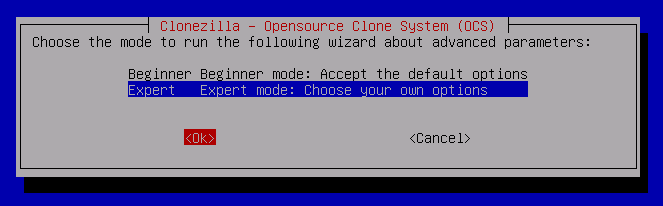
We will now enter the expert mode. I personally think this is very important, as you can control all steps of the backup procedure.
Now you need to choose the operation. You can backup either an entire disk or specific partitions. We will do the latter. We want to backup the root (/) partition of our operating system, in this case Fedora 14, before making a distro upgrade. This means that if something goes horribly wrong, we can restore the old state.
It is important to remember that we do NOT want to touch any other partition, which may contain other operating systems or personal data. You must know exactly what you're doing.

A word about savedisk
Savedisk operation lets you clone an entire disk. This can be useful, although I think saving specific partitions is more effective. You gain modularity and flexibility and save space. Data partitions do not need to be images, because there is no importance to partition table or filesystem structure.
Now choose the partition you want to backup. This partition must be unmounted. In our case, we want to backup sda1, which is the first partition of our disk. This is the root (/) partition of the Fedora system.

In this step, you can choose advanced parameters. For example, you can generate checksums, remove extra stuff like page and hibernation files in Windows, run a filesystem integrity check, and more. Let me point out the important ones:
-c is important. Confirmation is always good.
-j2 allows cloning hidden data between MBR and the first partition - This refers to disk sectors 1-62 between MBR, which rests in sector 0 and the first partition, which starts at sector 63 for legacy reasons. Bootloaders like GRUB may keeps data there. Backing up this data does not hurt, although if you are only backing up and restoring partitions, this area will remain untouched.
Do not skip NTFS integrity check. I would advise against using -rescue if you really don't know what you're doing. Filesystem check and repair can be useful, although working with corrupt filesystems is always a bad idea. Use only if you're desperate. If you must, perform a filesystem check BEFORE using CloneZilla.

Choose the compression option. CloneZilla can utilize multiple cores on modern systems. This is a new feature, but definitely worth exploring. Of course, if you are not sure or have never used this or feel uncomfortable testing a new option with your critical data, then go for the simplest and safest option.
In general, the tradeoff is between the backup speed and compression rate. Some algorithms are slower, but they conserve space and vise versa. My recommendation would be either -z1 (or -z1p) or -z2 (or -z2p) for most people.

Confirm your choice.

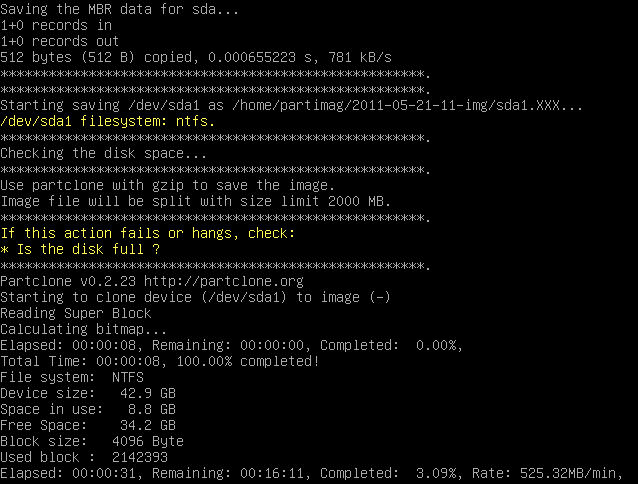
And we're running.

Restore
Now, we will restore the partition. The first several steps are identical. You need to choose the CloneZilla image repository. After you enter the expert mode, instead of selecting saveparts, you need to select restoreparts, because this is what we did earlier - we saved a partition.
Remember, we are restoring an image of a specific partition table onto a system that may have one or more operating systems, with multiple partitions. This procedure can be considered a rollback of changes done to one of the partitions, without changing the rest of the disk data.

You need to remember this. Restore operation is not just blind dumping of data to a disk. This is a very specific, targeted operation. In our case, we only want to restore the Fedora root partition. We do not want to touch the bootloader. We do not want to alter the partition table in any way, as we have other, critical data on the disk.
A word about restoredisk
Restoredisk option allows you to restore an entire disk, which means all of its contents, including the bootloader, the partition table and different partitions contained therein. When using restoredisk, CloneZilla can try to automatically resize partitions to match the destination. This is effectively a disk clone procedure. The disk you want to clone the image to does not have to have a valid partition table. Back to our business of restoring the partition. Now choose the image file you want to restore. This is the image we saved earlier.

Now choose the destination. It is very important that you make the right choice. Do focus, as this is a crucial stage of the restore procedure.

Now, the advanced restore options. You need to be extra careful here. There are many options and they can be baffling, so please don't rush and pay attention.

-g restores GRUB - if GRUB exists. No need if you are only restoring a partition and you know the bootloader functions properly. You can also use classic GRUB restore methods, if you require. Valid for both GRUB and GRUB2.
-e1 auto adjusts filesystem geometry for NTFS boot partitions. Good.
-e2 sounds extremely cryptic. What it says in layman's terms is that CloneZilla will try to restore the Windows bootloader (NTLDR) in the best way it can, so you avoid any need for repairing a failing Windows system afterwards. You may want to use the CHS value saved with the image, in which case you want the -e option. For most people, best left untouched.
-c is good. We want confirmation.
-r is preselected, but not relevant here. It will try to fit the filesystem to match partition size, which is good if your target is bigger or smaller than the one saved in the image.
-j1 will restore MBR, if you suspect it's damaged for some reason. This does not work if your partition layout has changed between the saved image and the restore.
-j2 works on sectors 1-62. Not relevant for partition backup, but good to know.
Mind the other warnings and messages. For instance, don't use the batch mode. Ignoring the CRC checks is also not recommended as this might indicate a corrupt or invalid image, which could further complicate things.

Now, you need to decide whether you want to touch the partition table. Remember, you are only restoring a single partition. Therefore, you do NOT need or want to create the partition table. We want the first option, which is -k.
If you are restoring an entire disk, then yes, maybe you do want to do this. You can use the partition table saved from the image. Alternatively, -k1 option can be useful.

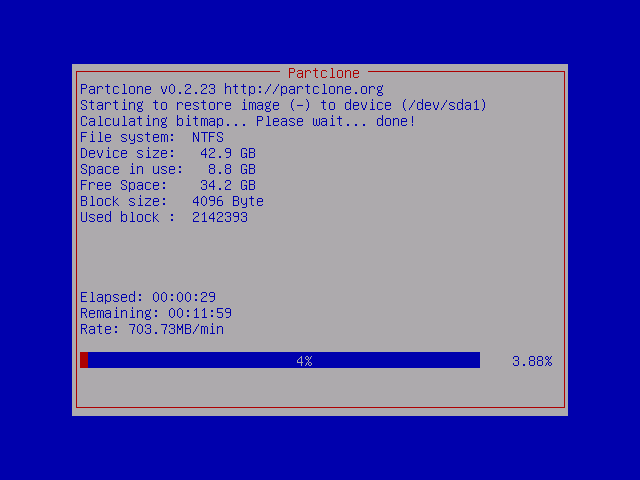
A few confirmations and then:

And we're done. Reboot and check. It should be ok. However, there is no guarantee. While this procedure has worked for me many times without a hitch, both with CloneZilla and other imaging software, you may be the unlucky one.
Now, a few Windows 7 screenshots
For those of you using Windows, the procedure is virtually identical. To have you convinced, here's a sequence of screenshots that runs through the same steps like before. We choose the image repository, we save a partition there. When restoring, we mount the image repository, choose the correct image, choose the destination, set the restore options, like MBR and Partition Table creation (or rather not), and that's it. Simple.


My most sincere recommendation is that you test. Use a non-critical system and run half a dozen backups and restores, including deleting the contents of the disk after backup and restoring them, deleting the partition table, ruining the bootloader, etc. Only after you have battle-tested the software and yourself in this wide range of situations will you be comfortable with the backup and restore procedure.
Data, well, that's a different story altogether. Keep it backed up in many ways and shapes, multiple instances. As long as your data is safe, you'll be fine. And we're truly done now.
Conclusion
I hope you find this tutorial useful. It's a real-life case, no nonsense, backup and restore, including critical advanced options. Working with system images requires patience, skill and courage, but it gets easier with time. Even so, do not ever let over-confidence best you.
Always make sure your personal data is safe, regardless of what you're planning to do. Never test backup and restore on production machines. Pay close attention to details and advanced options. If in doubt, stop, read and ask. With some luck, my two imaging tutorials on the subject, as well as the GParted tutorial ought to provide you with enough knowledge and guidance to successfully and safely master the world of system imaging.
Cheers.