Updated: May 14, 2012
Instancing Brush is one of the most important features in Kerkythea, a free, cross-platform and, above all, a super-awesome 3D rendering software. Why, you may ask? What's so special about it? Well, let's say you want to create a 3D model. A modern tank, perhaps. So you go about rendering the model, and it comes out super-fine. The only problem is, it looks suspended in thin air, and no amount of GIMP effects can really make up for the lack of ground.
At this stage, you may decide to add some ground-like props in your model, which might somehow help create the illusion of realism. But it seems tedious work, plus you might not be satisfied with the textures or detail. Not to worry. There's an alternative. It's called the Instancing Brush and it will help you add realistic-looking fully renderable background props to your model. Let me show you how.

Grab materials
To do proper instancing, you will need some materials. Grass comes to mind as a nice ground prop. All right, you can find some lovely grass model libraries in the official Kerkythea repository. Download them, then extract them into the Models sub-directory of your program installation.
Start Kerkythea
OK, open the program.
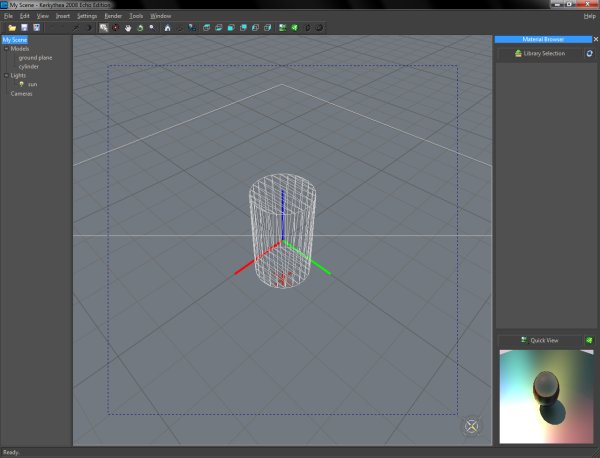
Prepare some setup. For example, I created a ground plane and placed a cylinder on top of it. Both these basic primitives are available under Insert in the file menu.
Apply materials
Let's add some textures to our two objects. In theory, we can leave the ground plane uncolored, but it's best if we give it a texture that will closely match the final result. Do not confuse the grass texture with grass model libraries. These are two different things. You can also apply some material to your cylinder.

Insert grass library
Now, let's add a grass library. Insert > Model > Grass. The package contains four different types of grass, each with four different turf options. You can add large areas or individual planes. The latter are most useful for non-uniform surfaces or when you want to achieve a seemingly random pattern rather than blanket coverage.

The inserted grass will now show in the coordinates center of your model. This may not be what you like, so you can delete that specific instance. What is important is that one or more grass models show in the left pane.

Add Instancing Brush
Now, we need to add the Instancing Brush. It's available under Tools.


The Brush may appear a little confusing at first, but it's quite simple. What you need to do is select the brush instance, which will be one of the grasses we inserted, and the target surface, which will be the ground plane. Those are the two important factors.
To mark them, FIRST select them, then click Instance and Canvas buttons in the Instancing Brush window. In other words, double click on the relevant grass in the left pane of the main window until the yellow star appears near it, and it shows highlighted in the main area. Then, click Instance. Repeat the same for the ground plane and the Canvas button.
Once the two are selected, you're good to go. But you might want to tweak some of the effects, including Perturbations and Constraints. The first category lets you choose the spatial randomness of your grass. You don't want all stalks to be placed at exactly the same angle and size, as this is not how it works in real life, so you can modify the angles in all three directions, as well as the height of your grass. Distance is another important option. It tells the average density of objects you can place on the target plane. If you want to go for a really thick grass layer, you will want to reduce the distance to a minimum. If you're looking for one or two stalks here or there, then you might want to increase the value.
In the Miscellaneous section, Population lets you choose among the available options, created from your other options. The higher it is, the more variance there is. Tool Size is as simple as it says. Finally, hit Populate to randomly create grass or use the Brush button to place objects as you see fit.
Brush in action
Once you create your brush, you must name it. You can have multiple brushes using similar materials, so you will not need to recreate them all the time. This is especially useful during early testing.

And here's what it looks like:

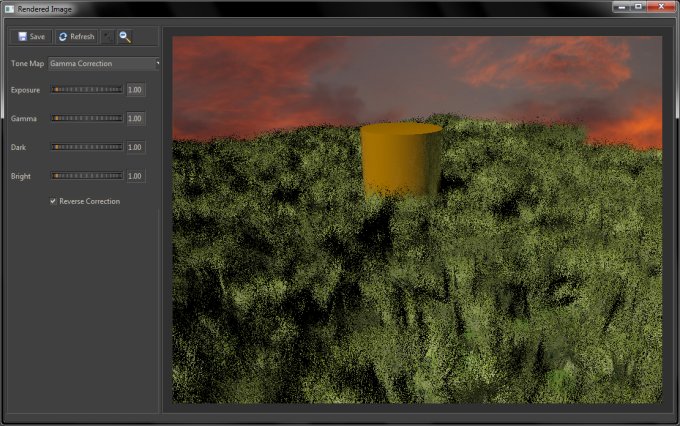
Of course, you must render the image to see what gives.

Not good enough. We need a thicker growth, more variance, perhaps some sky background, something. In fact, for best effect, you should use tiny grass to cover the surface of your target plane, then slowly increase the size and insert additional instances.
Here's an example with a single plane grass model. Looking better:

But we need much thicker population:


Finally, you get something like this:
And in my own sweet galleries, it looks like something this - do not forget to check my new tank and Mechwarrior articles for more details. Indeed, in my Mechwarrior article, I did promise to talk about the grass rendering, so here we are.


Conclusion
And there you go. Now you know how to create realistic grass in Kerkythea, fully rendered with shadows and lighting and that magical 3D fullness. Replace the grass models with anything else you like, and you will be having some awesome fun revving your CPU to the max with those lovely renders.
Instancing Brush is definitely one of the trickier yet more important elements in Kerkythea. But once you get to know how to use it, it becomes total fun and adds life and color to your models. Hopefully, this tutorial ought to make your life somewhat easier. Well, see you around. And don't forget to browse through all of my 3D galleries.
Cheers.