Updated: May 4, 2011
If you've been reading my Virtualization section, you know that my focus so far has been mostly on VMware and VirtualBox, with a tad bit of cloud stuff and image remastering. Well, time to branch out. Today, I'd like to formally begin a whole new era of tutorials with KVM. Later on, there will be Xen and other weird beasts, but for now, our topic is KVM.
Starting with this guide, we will learn about the KVM (Kernel-based Virtual Machine) technology, developed by RedHat, available as a free, open-source alternative to other commercial solutions. We will learn how to download, install and setup KVM, what tools we can use to manage virtual machines, what options are available, command-line usage and scripting, and more. We will also take a look at advanced networking and storage configurations, as well as many other cool things. So let's begin.

KVM - Glossary
Let's start with a very brief overview of how KVM works. Nothing major, just a tiny intro so that you know the basic terminology. Don't worry, it will all be very simple soon.
KVM functions by utilizing the CPU virtualization technology extensions on modern Intel and AMD processors, known as Intel-VT and AMD-V. Using a kernel module loaded into memory, KVM utilizes the processor and, via user-mode driver based on modified QEMU, it emulates a hardware layer upon which virtual machines can be created and run. KVM can also be executed without the CPU extensions, but then, it will run in a pure emulation mode using QEMU, resulting in a significant performance penalty.
KVM can be managed either via a graphical management tool, similar to VMware products or VirtualBox, or via command line using several methods.
The most popular GUI is called Virtual Machine Manager (VMM), developed by RedHat. The tool is also know by its generic package name virt-manager. It comes with a number of supporting tools, including virt-install, virt-clone, virt-image, and virt-viewer, which are used to provision, clone, install, and view virtual machines, respectively. VMM also supports Xen machines.
The generic KVM command interface is provided by virsh. Specifically, you can use the supporting tools, like virt-install for creating your virtual machines. On Ubuntu, there's a special ubuntu-vm-builder tool that can be used for provisioning Ubuntu builds, developed by Canonical.
The multitude of names can be confusing, but take it easy and you'll get the idea. However, to make it just a little bit more confusing, KVM also has its own syntax, similar to QEMU. It is not a recommended way of managing virtual machines.
For more information, please consult these pages:
The Kernel Virtual Machine - Community Ubuntu Documentation
KVM tutorials on howtoforge.com
KVM/Virsh - Community Ubuntu Documentation
All right, that was step 1.
KVM - Pros and cons
Should you use KVM? Well, that depends what you want to achieve.
If you are a casual home user, a virtualization hobbyist or an intermediate geek, KVM could be a little difficult to start with. It's primarily a command-line tool, not as intuitive or friendly as VMware and Virtualbox products. KVM feels many years behind the competition, in terms of GUI management, although it is just as powerful when it comes to delivering. In fact, because it is designed to be used as a command-line tool, you enjoy better productivity and more control in the long run. As such, KVM makes most sense in the business environment.
Furthermore, if your CPU does not support virtualization, KVM will be a big waste of time for you, as you will be running in an extremely slow and inefficient emulation mode. KVM is also known to conflict with Virtualbox, but more about that in a separate tutorial.
Therefore, KVM is for people with a keen interest in virtualization, most likely administrators and professionals. It's not your cuddliest home toy and might not be for many years to come. But if you're willing to dig in, you'll master a complete new language, which will later serve you as a force multiplier with other technologies. While VMware or Virtualbox prefer that you use their GUI tools, KVM is oriented at the raw efficiency of command-line scripting.
To sum it up, KVM is good for you if you are looking for a free modern virtualization solution with an unlimited usage mode and without additional licensing fees or feature tiering, a powerful command line interface and you're not afraid to dirty your hands. KVM is not good for you if your CPU does not have virtualization extensions, you're afraid of writing scripts, have no desire to dabble in code, and prefer administratively simpler solutions like VMware Server, ESXi or Virtualbox.
All, right, let's get going.
Test platform
You can use KVM in pretty much any Linux distro. In general, RedHat flavors favor KVM. RHEL ships with KVM enabled in the operating system, so you can also find it in RedHat-based distros like CentOS, Scientific Linux, or Fedora.
Since I'm running mostly Ubuntu at home, I decided to test in Ubuntu, installed on my rather brand-newish HP laptop, which has a revvy i5 processor that supports virtualization. Later this year, I'm planning on deploying either the newest release of CentOS or Scientific Linux on my Linux-dedicated multi-boot machine, so you'll see additional tutorials for those distros, too. We'll get to Xen there, too.
This tutorial shows how to setup KVM on a 64-bit Ubuntu Lucid, the Long Term Release. Sequel guides and howtos will cover many other topics related to KVM, including using it alongside other virtualization technologies and resolving conflicts, advanced management functions, scripting, and more.

Now, finally, let's begin in earnest.
Prerequisites
You need a CPU that supports virtualization. This can be checked thusly:
egrep -c '(vmx|svm)' /proc/cpuinfo

If you get a non-zero value, you're good. BUT ... you will also need to check that virtualization technology is enabled in BIOS. Indeed, after enabling the feature, you will have to cold power-cycle the machine for the change to take effect.
Once this is done, boot into your operating system and get KVM installed.
To check, please run kvm-ok:

Download & install KVM
To get KVM install, please get these packages (true for apt commands):
apt-get install qemu-kvm libvirt-bin
Optionally, you can install these - most recommended:
apt-get install bridge-utils virt-manager python-virtinst
P.S. The package names will vary between distributions. For instance, virt-install may come branded as python-virt-install or python-virtinst or even virt-install. The dependencies for virt-clone, virt-image and virt-viewer should be automatically resolved.
Contrary to what most tutorials mention, you do NOT need bridge utilities. You only need them if you want to bridge your virtual adapters with your physical cards. I've shown you a detailed example of this in my Virtualbox networking tutorial. The principle is the same.
Most tutorials also mention the fact that most Wireless network interfaces do not support bridging. This may be the case, but in all my testing, I was able to successfully bridge my Wireless adapters, so keep your hopes high.
VMM (virt-manager) is highly recommended. Likewise, you want all the helper tools, including virt-viewer, virt-install, virt-image, and virt-clone.
Lastly, you can also opt for ubuntu-vm-builder:
apt-get install ubuntu-vm-builder
You will also get a whole bunch of dependencies auto-resolved, so your downloads can take a while. P.S. On RedHat, use yum install. On SUSE, use zypper install.
Conflict with Virtualbox
Again, contrary to what most tutorials say: you can have both KVM and Virtualbox installed on the same host. You may not get them running both at the same time. In other words, one or the other kernel module needs to be unloaded from memory. But there's no reason to rush ahead. Try, see if it works for you, and if not, only then take corrective actions.
But this can be done in-vivo, so no worries there. You won't need to reboot or anything as drastic as that. I'll show you a separate tutorial that handles this case. In fact, I have both installed and running on the test host.
Using KVM
Now, the really fun part. We will start with the VMM, as it is a GUI tool and this is what most people will and should start with. For all practical purposes, it's very similar to other tools you know, like the VMware console or perhaps Virtualbox.
Virtual Machine Manager (VMM)
Let's take a tour.
The first time you launch the program, it will show two categories, both not connected. These refer to your localhost KVM modules, still not in use. To use, right-click and choose connect.

To add new connections, click File > Add Connection. This will open a window that lets you specify the Hypervisor type and the connection type. VMM can use both local and remote connections, including QEMU/KVM and Xen. You can connect using all kinds of authentications methods.


You can also autoconnect, which means that the next time you fire up VMM, these connections will be ready for you. This is similar to what VMware Server asks you when you start the program. Just for reference:

Kernel versus Usermode
You may be asking what the difference between normal/default and Usermode is? Well, Usermode allows you to run without administrative privileges, but your network capability will be limited. All right, let's move on.
VMM overview, continued
Let's see other functions, before we create a virtual machine.
Network functionality can be reviewed or changed under Host Details. We will have a separate tutorial that teaches how to work with KVM network. And we'll setup bridge utilities, too, so don't worry.

Likewise, you can change the storage settings. There'll be a dedicated guide, I promise:

Change preferences
The VMM has a handful of options you can tweak to make it look and behave smarter. You can enable the system tray icon, set a statistics polling interval, enable polling for disk and network metrics, which are deselected by default, configure console keyboard grabbing, console scaling, audio options, and set confirmation windows for machine activities.


Later on, all of these will allow us to view our virtual machine metrics in more detail and with better control. For instance, showing an Ubuntu guest CPU, Disk I/O and Network I/O:

Here's the system tray icon:

Finally, we're ready to create a new virtual machine.
Create virtual machine
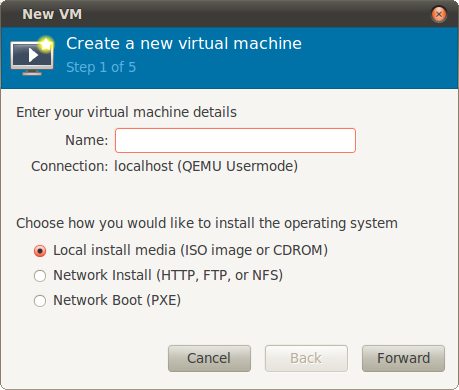
We can do this using VMM or the command line. We will begin with the GUI. The first step is quite intuitive. Enter the name and the install media location. You can use local storage in the form of ISO images or CD/DVDs, HTTP or FTP servers, NFS area, or PXE.
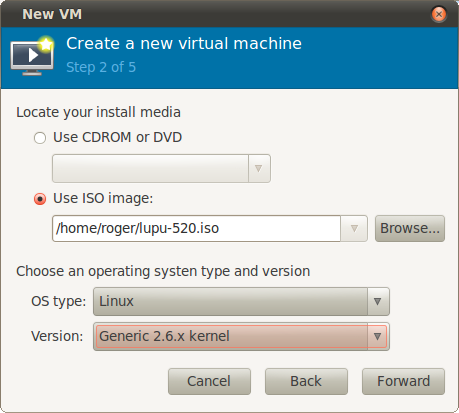
We will use local install media. Next, choose either a physical device or an image. In our case, we will use an ISO. Then, choose the OS type and the version. This does not have to be precise, but an educated guess is good. It allows additional virtual machine optimization.

Allocate RAM and CPUs.

The fourth step is quite interesting - storage. You can create a new image or use an existing one. You can set the size and preallocate all space, which is good for performance, plus it reduces fragmentation.

We will focus soon quite a bit more on the storage. For now, let's either assume we have a disk ready - or that we will create one in the default storage pool. Please note that if you're running in Usermode, you won't be able to write to /var, which is the default storage pool location. You will need to create a new storage pool that is accessible by non-admin users, but more about that in a separate article.
Step 5 is a summary, with some advanced options. You can change your network type, set a fixed Mac address, choose the virtualization type, and the target architecture. If you're running in Usermode, your network options will be limited. If you're not using bridge utilities, you won't be able to bridge your interfaces. Lastly, if you have no CPU virtualization extensions, the Virt Type: field will read QEMU and not KVM. We will see an example of this later on, when we discuss the major drawbacks of running in the emulation mode. For now, here's what a typical Ubuntu virtual machine setup looks like:

Our machine is ready to use. We will soon power it up and use it.
Virtual machine options
Like VMM itself, the VM console has a few interesting options. You can send signals to your guest, you can switch virtual consoles, force reboot and power off, clone, migrate, save, take screenshots, and more. Again, very similar to the competition.

Here's a pair of screenshots teasers for the clone and migrate options. Down the road, we will have detailed tutorials, focusing both on the GUI and CLI functionality.


Virtual machines running
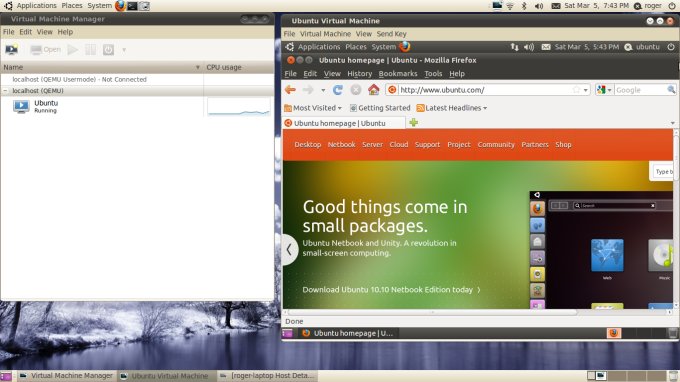
The fun part. Here's a handful of nice screenshots ...
Let's begin with Ubuntu 10.10 Maverick, 32-bit version, boot menu:

Puppy Linux, shown against a lovely desktop:

Ubuntu running, NAT-ed, no worries. Notice the CPU utilization is very low. Important, pay attention for later on when we discuss the emulation only mode. I'm nagging you, but please bear with my ultra-turbo education.

You can also scale the console window to fit guest; this is another option available in the viewer menu. Then, you can also use the preferences to autoscale the consoles. Here are Puppy and Ubuntu, side by side:

Here's the system usage; minimal. With this kind of smart consumption, you can generously overcommit and enjoy more virtual machines than your physical hardware would normally permit, with a single machine bound to a core.

Eventually, you can also delete a machine and its associated files:

Now that we're comfortable with basic usage, let's do some command line.
Command line
Now, let's see the infamous command line. For example, using virsh to list all available virtual machines.
virsh 'list --all'

Here's the sequence of commands to get a virtual machine created and running using virt-install. Please note that I'm not a KVM guru. You have template code in the man pages, and you can find a billion examples online.


The actual command is:
virt-install --connect qemu://system -n puppy -r 512 -f puppy.img -c lupu-520.iso --vnc --noautoconsole --os-type linux --accelerate --network=network:default
So what do we have here?
--connect qemu:///system defines the type of hypervisor used. system is used when running on bare metal kernel as root. session is used for non-root users. You can recall the differences in VMM, with Usermode, right-click connect, you get the idea. This also works for xen.
-n puppy is a unique virtual machine name. You can use virsh to rename or delete the guest if you're not satisfied with your choice.
-r 512 specifies the RAM.
-f specifies a disk file. In this case, I'm using a puppy.img disk image I created using a dd command. To conserve space, I created the image as a sparse file. You can learn more about how to create sparse files in my second cool Linux hacks article.
-c specifies the CD-ROM, either a physical device or an ISO image.
--vnc setups a guest console and exports it as a VNC server. --noautoconnect will not automatically open the console when the virtual machine is powered on.
--os-type specifies the operating system for the guest.
--accelerate allows KVM to use optimization functions that accelerate the performance of the guest system, if possible.
--network defines the network type. We're using the default connection.
We could have used many other functions, like setting up the number of cores or bounding the machine to a CPU core, setup a fixed MAC address for NIC, use no storage, change the keyboard map, and more.
All of these are listed in the man pages. Not really intuitive, but becomes easier with use. In fact, the learning curve is not that high, despite the initial impression. Once you get the hang of virt-install, you can fiddle with other commands, start and stop machines with virsh, and Bob's your uncle.
Other things
A few more details worth mentioning.
Running in pure emulation mode (don't)
I told you this is completely inefficient. Now, a proof. For instance, take a look at Host Details Overview. In the Performance graph, CPU usage is max. at 100% of the available resources for the virtual machine, in this case one core, which translates to 25% utilization. Almost like DOS. This means that four virtual machines, no matter how tiny or hungry, will cripple a four-core host.

Additionally, the performance will be horrible. If an Ubuntu guest takes approx. one minute to boot with the image loaded on the internal 7,200rpm disk when running with Intel-VT extensions enabled, it takes about 20 minutes to do that in the emulation mode. I think this is a downside of QEMU/KVM compared to other solutions, which still offer fairly decent performance even without CPU extensions.
More good reading
I highly recommend the KVM series on howtoforge.com, linked above.
Then, you should also read these:
Discover the Linux Kernel Virtual Machine
Conclusion
I sincerely hope you've liked this tutorial. It's fairly long and detailed, even though it documents only the first steps to get started with KVM. But it does offer an insight into a lot of things, including initial setup and prerequisites, command-line and GUI tools, management options, how to create and run multiple virtual machines, and more.
There are going to be a ton of sequels, which will cover advanced storage and networking configurations, including bridged networking, how to clone and migrate virtual machines, how to resolve conflicts with other virtualization software and more. Not strictly related, there are also going to be a whole bunch of articles on Xen and ESXi, too.
As you can see, KVM is quite powerful, even though it may appear a bit daunting to new users. Its management options are definitely less newb-friendly than some of its rival, but luckily, some of the fear and confusion have been spirited away today.
Well, I guess that would be all. Enjoy!
Cheers.