Updated: March 22, 2010
Hello there, dear readers. Time for the second article of highly useful, cool and fun utilities, commands, and tricks that should help you gain better productivity and understand your system better. In the first part, we learned about a whole bunch of great things, including top in batch mode, how to read process account logs, how to measure system activity with a range of programs, and how to write a simple UDP server-client.
Now, let's see a few more tricks that will help you master a higher, cooler level of Linux knowledge and allow you to impress you significant others, including your boss.
1. Sparse files
What they be, you're askin'. Well, sparse files are normal files - except that blocks containing only zeros are not really counted. In other words, empty space inside sparse files is just listed, without actually taking any physical space. This, in contrast to regular files, where everything is preallocated, including bits that hold no data.
If you're a fan of virtualization, you have come across sparse files - virtual machines disks can be sparse files. If you're creating virtual machines with, say 10GB space, but do not preallocate it, then you have witnessed sparse files in action! Dynamically expanding virtual disks are sparse files.
Sparse files have an advantage of conserving space until needed, but if you convert them back to raw format, like during the conversion of VMDK virtual disks to AM2 format for the use in Amazon EC2 cloud, then the files will be inflated back to their normal size. Now, the big question is, why sparse files, and what are they good for?
Well, sparse files are definitely useful in virtualization, but they have other uses. For example, when creating archives or copying files, you may or may not want to use the sparse option, depending on your requirements. Let's see how we can create sparse and identify sparse files, so we can treat them accordingly.
Create sparse files
Creating sparse files is very simple. Just move the pointer to the end of the file.
dd if=/dev/zero of=file bs=1 count=0 seek=1M
For example, here we have created a zero-size file, except the metadata, which by default will take the customary block size (say 4096 bytes). But we have also moved the pointer to the end of the file, at 1M location, this creating a virtual 1MB file.

Now, using the ls command, you may think it's a regular file:

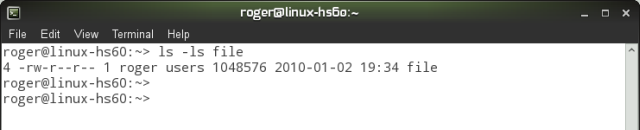
But you need the -s flag in the ls command options to really know what's happening. The first field in the output will be the file size, in KB:
Similarly, you can use the du command to get the accurate report:

Just for comparison, here's what a real, 1MB file reports:


Pay attention to this when working with files. Do not get confused by crazy ls readings, because you may end up with a total that exceeds the real disk size. Use the appropriate flags to get the real status.
Moreover, pay attention when working with file handling, compressing and archiving tools, like cp, tar, zip, and others. For instance, cp has an option that specifies how the sparse files should be handled.

2. Having fun with atop
It's not a spelling error, there's no space missing between the letter a and top. atop is a top utility, with some spice. The full description is AT Computing's System & Process Monitor, an interactive utility to view the load on a Linux system. It can do everything top does, and then some.
atop is a very useful program and you'll fall in love instantly. The main view is very similar to the original tool, except you have more info and it's arranged in a more intuitive fashion. You'll also have color readings for critical percentage of resource usage.

In the bottom half of the main view, you will be able to sort the process table based on different columns, like memory or disk. Press m to sort by memory in the descending order. Press d to sort by disk activity in the descending order.


You can save data into flat files, any which way you want.

Better yet, you can also write data to logs in compressed, binary form and then parse relevant fields, compiling useful time-dependent statistics about your system load and usage, helping identify bottlenecks and problems. The manual page is very details and provides examples to get you started instantly.
For instance, the following command:
atop -w /tmp/atop.raw 30 10
will collect the raw data every thirty seconds a total of ten times. Very similar to iostat and vmstat, as we've seen the last time. Afterwards, you can pull out desired subsets very easily.
For example, to view the processor and disk utilization of this file in parseable format:
atop -PCPU,DSK -r /tmp/atop.raw
Here's what the data looks like:

Now, if you don't like the separator, just remove it with some simple sed-ing.
sed -e '/^SEP$/d' /tmp/atop.raw > /tmp/f-clean.csv
Then, you can open this file in, say OpenOffice and create some impressive graphs:


3. ASCII art
ASCII art won't make you an expert, but it can be fun. Oh, I'm not talking about using high-end tools like GIMP; anyone can do that. I'm talking about deriving fun ASCII art from the command line.
There are several ways you can achieve this, we will see two.
boxes
boxes is a neat little utility that lets you create your own command-line fortune cookies, similar to what Linux Mint does. The tool has a number of template ASCII figures available, on top of which you add your own little slogans.
boxes is available in most repositories, so go grab it. Then, start playing. For example, to have a cute little kitten write something witty in your terminal, run boxes -d cat, type your own message and hit Ctrl + D to end. Soon thereafter, a little cat will show in the terminal, along with your own message.

Innocent, sweet and fun.
jp2a
This ominous sounding command is not one of those robots in Star Wars. It's a utility that can convert JPEG images, any one you want, into ASCII art. Very useful and impressive.
For example, take your stock Tux. Now, the image I found was in the PNG format and jp2a does not handle these. So I had to convert the image to JPEG first.

And then, just run the command against the image name and Voila! Tux is your uncle!

4. xargs
xargs sounds like a peon curse from Warcraft I-III, but it's in fact a very powerful and useful command that builds and executes commands from the standard input. In other words, when you use complex chains of commands in Linux, sometimes separated by the pipe symbol (|), you may want to feed the output of the last command into the input of the next one. But things can get complicated.
Luckily, xargs can do everything you need. Let's see a few simple examples.
Example 1:
We will display all the users listed in the /etc/passwd file. Then, we will sort them and print them to the console, each on a separate line.
The command we need is:
cut -d: -f1 < /etc/passwd | sort | xargs echo |
tr ' ' '\n'

xargs takes the list of usernames, one by one, echoes them to the console, while the tr command separates into each line, replacing the space delimiter with a new line feed.
Example 2:
Here's another example. xargs is particularly useful when run with the find command and quite often sed. Let's say you want to find a list of certain files in your directory and then manipulate them, including changing their permissions, deleting them or just listing them.
With xargs, you can make this affair a one-liner.
find . -type f -print0 | xargs -0 ls

Here we're using xargs with the -0 flag, which instructs it to ignore whitespaces and treat slashes and backslashes literally, making it quite useful if you expect your files to contain quotes, spaces and other exotic characters. To do this, xargs requires the find command to provide input in the right format, which is exactly what the -print0 flag does.
If you're not convinced xargs is mighty, try doing a few exercises without it and see if you can manage to get the job done in a single line of shell code.
5. Swapon/swapoff
Another allegory, Karate Kid. Wax on, wax off. Except that we're dealing with the command that handles swap files on Linux. I do not know how often you will have to handle swap manually, but if you're using live CDs or work with RAID, then you just might.
swapon/swapoff allows you to turn on/off swap devices, set their priority and just plain list them. Changing the priority could be useful if you have swaps of different sizes or set on disks with different speeds.
For example, to view all swap devices:
swapon -s
A screenshot of a typical output:

And sometimes, you just may want to turn swap off. For example, swap may be used by the live CD, preventing you from unmounting the disk for partitioning, which could lead to errors. In this case, a simple swapoff will do the trick.
Speaking of disks and speeds ...
6. Use ramdisk for lightning-fast execution
RAM is not cheap and you should not waste it as simple storage space if you need not to, but sometimes, just sometimes, you may be in a bit of a hurry and would like to get your project completed as soon as possible. If your work entails quite a bit of disk activity, which is usually the bottleneck of the program execution on modern machines, then using a ramdisk could help.
ramdisk is a file system created in the system memory (RAM) and treated as a regular disk device, hence its name. For all practical purposes, if you give someone a system with a RAM disk, they won't know the difference, except the speed. ramdisks are much faster.
Here's a little demo.
First, let's create a ramdisk (as root or sudo):
sudo mount -t tmpfs none /tmp/ramdisk -o size=50M

We created a 50M disk and mounted it under /tmp/ramdisk. And now, let's compare some basic writes ...
Normal disk:

RAM disk:

Of course, the results will depend on many factors, including system load, disk type and speed, memory type and speed, and whatnot, but even my 23-second demonstration shows that using ramdisk you can boost your performance by 50% of more. And if you attempt repetitive serial tasks like copy, you will be able to improve your execution time by perhaps an order of magnitude.
7. Perl timeout (alarm) function
Again, Perl as the last item. Now, I have to reiterate, I'm not a skilled Perl writer. I am a cunning linguist and a master debater, but my Perl skills are moderate, so don't take my perling advice as a holy grail. But you should definitely be familiar with the timeout function, or rather - alarm.
Why alarm?
Well, it allows you to gracefully terminate a process with SIGALARM after a given timeout period, without having your program stuck forever, waiting for something to happen.
Now, let's see an example. If you've read my strace article, then this little demo should remind you of some of the things we've seen there.
#!/usr/bin/perl
use strict;
my $debug=1;
eval {
local $SIG{ALRM} = sub { die "alarm\n" }; # NB: \n required
alarm 5; # timeout after 5 seconds without response
system("/bin/ping -c 1 @ARGV[0] > /dev/null");
alarm 0;
};
if ($@) {
die unless $@ eq "alarm\n"; # propagate unexpected errors
print "\nWe could not ping the desired address!\n\n" if $debug;
# timed out
}
else {
print "\nWe're good!\n\n" if $debug;
}
What do we have here? Well, a rather simple program. Let's examine the different bits separately. The first few lines are quite basic. We have the perl declaration, the use of strict coding, which is always recommended, and a debug flag, which will print all kinds of debugging messages when set to true. Rather useful when testing your own stuff.
Next, the eval function, which tells the program to die with ALRM signal if the desired functionality is not achieved within the given time window (in seconds). Our example is a simple ping command, which takes the IP address as the input argument and tries to get a reply within five seconds.
eval {
local $SIG{ALRM} = sub { die "alarm\n" }; # NB: \n required
alarm 5; # timeout after 5 seconds without response
system("/bin/ping -c 1 @ARGV[0] > /dev/null");
alarm 0;
};
Next, we set the program to exit if there are error messages ($@), printing a message to the user that informs him/er that we could not ping the desired address. What more, if the program execution got botched for some reason other than our timed alarm, we will terminate the execution, thus covering all angles. If successful, we continue with our work, plus some encouraging messages.
if ($@) {
die unless $@ eq "alarm\n"; # propagate unexpected errors
print "\nWe could not ping the desired address!\n\n" if $debug;
# timed out
}
else {
print "\nWe're good!\n\n" if $debug;
}
Some screenshots ... Here's the perl code. P.S. Just noticed the 10 seconds in the comment after alert 5; Well, it's an innocent error, but it does not affect the code, so you can ignore it.

Then, we have a good example:

And a bad one:

And just to show you it's a five-second timeout we're talking about, I've used the time command to ... well, time the execution of the script run:

ping is just a silly example, but you can use other, more complex functions. For example, mount commands. In combination with strace, which we've seen a few weeks ago, you can have a powerful trapping mechanism for efficient system debugging.
To read more about alarm, try the official documentation: perldoc -f alarm. To this end, you will need the perl documentation package installed on your system.
Why this exercise?
Well, it emphasizes the importance of proper checks when coding programs that use external inputs and outputs to work. Since you cannot guarantee that the other bits of code will cooperate with yours, you need to place failsafe checks to make sure you can gracefully complete the run without getting stuck. Along with input validation, timeouts and error exits are an integral part of cavalier programming.
Conclusion
That's it, seven lovelies this time. A magnificent seven. I did promise you sec, but it's too large to be just a bullet item. We will have a separate article soon, probably as a super-duper admin tool.
Anyhow, today you've learned several more useful tools, tricks and commands that should help you understand better your environment, work more smartly and be able to control and monitor your systems more effectively. Best of all, the tips given do not really require any specific platform. Any Linux will do. I used openSUSE 11.2, Ubuntu Jaunty and Ubuntu Karmic for these demos.
I hope you appreciate the combined effort. Stay tuned for more. We'll have several more compilations as well as dedicated, detailed articles on some of the more powerful programs available, including both mid-end and high-end tools, as well as advanced system debugging utilities.
See ya around.
Cheers.