Updated: September 5, 2009
You may have encountered this problem. You have recently updated your Ubuntu. One of the updates was a kernel upgrade, say from version 2.6.28-11 to 2.6.28-15, for example. Following this upgrade, you rebooted your machine for the changes to take effect. Only Ubuntu does not come up. You see a message like this on your screen:
Gave up waiting for root device. Common problems:
-Boot args (cat /proc/cmdline)
-Check rootdelay= (did the system wait long enough?)
-Check root= (did the system wait for the right device?)
-Missing modules (cat /proc/modules; ls /dev)
Followed by additional ALERT! messages. Something like:
/dev/sda9 does not exist ...
Or perhaps:
/dev/disk/by-uuid/34e5c1 ... does not exist ...
You are now in a shell called BusyBox. Instead of the standard shell prompt that displays your username, you see a prompt for initramfs. Is this the problem you are facing? Then read on.
Problem statement
Following a kernel upgrade, your system is no longer bootable.
Problem solution
Rule 1: Don't Panic!
Rule 2: Try to understand what changed
For less experienced users, understanding what went wrong can be difficult. I will try to help you reason out this problem, so that you have a clear methodology for handling similar issues in the future.
Compare the system state before the update and after the update
Many things can go wrong. To be able to solve the problem we need to focus our effort. The keyword to our problem seem to be the words busybox, initramfs and alert messages about devices/disks not existing. If you refer to Google, you will find a handful of links that point mainly to Ubuntu forums, where this problem is discussed, with several solutions offered.
While this gives us a good lead, I would like to postpone using any of the solutions for later. Our first task is to understand the problem. We have a problem with initramfs. The big question is, what is this thing?
What is initramfs?
The boot sequence is a long and complicated one. It begins with BIOS, which is a basic input/output system, burned into the computer hardware and is used to initialize the hardware components.
The second step in the boot sequence is the loading of a very small filesystem called Initial RAM File System or initramfs. This is a temporary file system that is loaded into memory and is used to initialize devices so that the real kernel can load.
initramfs uses a very small subset of drivers (called modules in Linux) to setup the hardware. This basic set includes disk drivers, USB drivers and maybe a few more. These drivers are contained in a file called initrd.img, under the /boot directory in your Linux installation. initrd stands for Initial RAM disk. If initrd.img is missing some modules, your system may not boot.
Whenever your kernel is upgraded, a new initrd.img file is built, containing the latest drivers for your kernel. You can check this by yourself. Open the /boot directory and see that you may have several instances of initrd.img files there, one for each kernel version that was installed.
All right, now we understand that something went wrong with our initrd.img file, most likely. We are in the boot stage before the kernel, so there seems to be nothing wrong with the kernel. We're past GRUB, so GRUB should be OK, too.
Nevertheless, you should ask yourselves whether you have manually changed anything in the GRUB menu during or after the system update just before the reboot that brought your machine into this state. If you have not, then GRUB problems are most likely not an issue here.
Now that we know where to focus our effort, let's take a look at the error messages again. Let's try to understand what the system is telling us and see if we can figure it out.
Analyzing the problem
We have this ugly message:
Gave up waiting for root device. Common problems:
-Boot args (cat /proc/cmdline)
-Check rootdelay= (did the system wait long enough?)
-Check root= (did the system wait for the right device?)
-Missing modules (cat /proc/modules; ls /dev)
Followed by an ALERT! message (missing device).
The actual problem is the ALERT! message. initramfs cannot find the device where it expects to find the actual kernel and therefore it cannot proceed with the boot sequence. The question is, why it cannot find the kernel?
This is where we refer to the first part of the message, the common problems section. The system offers us four possible solutions, the first three of which are related to GRUB and the last related to the initrd.img itself.
All of the suggested checks are valid things you need to check. Let's go through them one by one.
Boot arguments, which you can see by running cat /proc/cmdline in the BusyBox shell. This line corresponds to the kernel line in your GRUB menu. If you have not manually changed this line, there should not be any issue with it.
In some of the threads discussing this issue, some users pointed out the fact their device root=/dev/hdXY or root=/dev/sdXY could not be found and the use of this kind of notation is the reason for the failure. Others pointed out that their device root=UUID=ABCD could not be found and that this other notation was the reason for the failure. The suggested solution was to ditch the existing notation and try the other one.
Whether you use disk notation by name (by-name) or by ID (by-uuid), your GRUB is smart enough to pick either one and boot without any problems. Moreover, remember that this worked before the update! There is no reason why it should stop working all of a sudden.
Check rootdelay= implies there was not enough time for the system to initialize the devices. As a workaround, which is indeed mentioned in a number of threads, you may want to add a short delay to allow the system enough time to identify and initialize the devices.
To affect this change, you need to append rootdelay=XXX to the kernel line in the GRUB menu. XXX is a timeout in seconds the system will wait before trying to load the kernel. Various forum threads suggest 120 seconds or more.
Again, remember that there was no need to do this before the update. This might work, but this is not a solution, per se. It is also quite impractical because of the very long boot times involved.
Check root= suggests checking whether the root device in the GRUB menu has changed. Root device is the partition where GRUB expects to find the /boot directory with the kernel inside. If the root device points to a wrong partition, you won't be able to boot.
There was no need to do this before the update. If you've not manually tampered with GRUB, there is no reason to tamper with this setting.
All right, we have reviewed the three GRUB related options. They might offer some hope, but when you think about it, they are not related to our problem. Our GRUB menu has not changed. There is really no reason why old settings should not work.
This leaves us with the last option, Missing modules.
Missing modules
We're back to how initramfs functions: initrd.img packs a very small subset of drivers (modules) for the initialization of devices. If some of these drivers are missing, the initramfs will not be able to identify the hardware.
In my case, the error message was about missing /dev/sda9 device. Indeed, checking under /dev/ while booted into BusyBox, there were no sdX device whatsoever. This means I was probably missing the right modules that load the SATA drives.
As suggested, running cat /proc/modules will display all the modules that initramfs uses. What we need to look for are ide, ata, sata modules, which are used to initialize disks.
There were missing, which explains why the boot failed.
Now, why would they be missing?
Possible bug
This could be a bug in Ubuntu. I will have to check this one out. But the plain fact is, initrd.img was not re-built properly after the kernel upgrade. For most people, this is a serious issue that they won't be able to solve easily.
We have a root cause. What now?
Fixing the problem
What to do now?
Fixing initrd.img is not a simple thing for new users. However, please note the very simple and elegant way that I used to fix the problem. Additionally, it provided me with extra information that helped narrow down the problem.
Multi-boot system
The machine that experienced the issue has four Ubuntu distributions installed, each one dedicated to a different task: one for serious work, one for Compiz demonstrations and eye candy, one for testing of software, and one for gaming. An article coming soon, btw.
All four installations run Ubuntu 9.04, updated to the latest kernel. Only the gaming set failed with the above message. This means that I could boot into any of the three remaining instances and try to solve the problem. Moreover, since we're talking same distribution and same kernel release on identical hardware, I was able to rule out possible leads right away. For example, all of the GRUB suggestions were invalid, because other three installations worked fine the way they are. Most importantly, I was able to compare the initrd.img file on a "good" installation compared to the one with the problem.
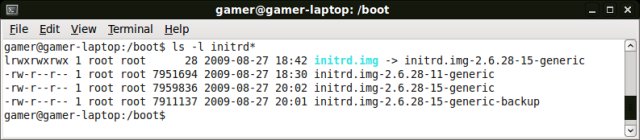
There was a difference in size! Compare the 2.6.28-15 and 2.6.18-15-backup. The backup file is the initrd.img file from the "bad" system. The one without a suffix is from a working Ubuntu installation.
Solution
To solve the problem, I simply copied the initrd.img file from the working installation into the bad one and that was it. Ubuntu booted well afterwards.
Of course, this solution necessitates you have multiple instances of the same operating system installed, but it pays off, especially if you're facing difficult little configuration problems. Additionally, it provides you with a baseline you can refer to.
Copying as a solution in general
Copying files from one machine to another may sound like a risky thing, but it is not. It's a perfectly simple and reasonable way of solving issues with botched configurations. Here's another example that emphasizes this approach:
Two of my work colleagues are testing Moblin 2 on their netbooks, one using Asus EeePC, the other using Acer Aspire One. While the colleague using EeePC managed to successfully compile the missing drivers for his wired network device, which Moblin did not support out of the box, the colleague using Aspire One was not so lucky. Seemingly a dead end, you'd say.
Failing the conventional methods of finding the right sources and compiling them, I suggested a very dirty hack of copying the compiled driver (.ko) from the Asus machine to his laptop and giving it a try. In the worst case, he would be inserting a wrong module into his kernel. Guess what? It worked.
Of course, the two machines happened to have similar or identical hardware, but the idea applies nevertheless. Sometimes, the simple tricks are all you need to get things done.
Conclusion
This short howto does not have any grand purpose except possibly helping other Ubuntu users with a similar problem. At the very least, it should help them understand what went wrong with their machine, even if they do not have immediate means to solve them instantly.
I will see if this phenomenon is listed as an official bug and whether it deserves such a classification. If you come across this issue or know people who are suffering from similar symptoms, please have take a look at this howto, it may save them a few moments of anguish and despair.
Have fun.