Updated: December 13, 2017
I was really thinking hard what the best, most descriptive and useful title for the topic today could be, and I came up with this. Long story short, my Lenovo G50 test laptop, which runs an eight-boot setup with Windows and various Linux distributions, has recently had its NVRAM go read only. I cannot change any UEFI settings, and therefore, I also cannot boot from external media and install any new systems.
However, I still want to somehow be able to make changes to the existing setup, so I spent a bit of time thinking, is there a way around this? Yes there is! What I'm going to show you today is a somewhat dangerous (data wise) trick that allows me to install new systems despite the obvious hardware limitation I'm facing. Follow me.
VirtualBox raw disk access
Before we begin, let me sternly warn you:
The stuff I'm going to discuss today requires expert knowledge and confidence working with virtualization and raw disk access. It's a very tricky and dangerous set of operations that can led to a severe loss of data and immense emotional pain. If you follow my instructions for whatever reason, you could end with a completely borked system, and lose precious personal information. Now, proceed with caution.
Now, once you have your data backed up and your system imaged, you may begin to consider testing this. So this is how it works: VirtualBox allows you to mount entire disks or specific partitions as virtual disks, hence the phrase raw access. Rather than creating a file container that will be the virtual disk, you actually use physical hardware directly.
And so, the idea becomes this: I can create a virtual machine, use the raw disk access feature, boot from an ISO, install the relevant operating system onto a physical partition, skip the bootloader setup, and then go into the physical instance of the operating system that controls the boot sequence (in this case, openSUSE), and update GRUB there.
Create raw disk
The following command will do the magic for you:
VBoxManage internalcommands createrawvmdk -filename file.vmdk -rawdisk /dev/sdX -partitions Y,Z -relative
What do we have here? We create a disk, somewhere, can be inside your home directory, or the dedicated folder where you keep all your virtual machines. You specify the raw disk you want to use (in my case /dev/sda), and the partitions you want to use. I decided to choose only one (/dev/sda8, which hosts CentOS 7.2), and also used the relative flag, which allows write access only to the specific partition. This should limit the amount of damage you could potentially do.
VBoxManage internalcommands createrawvmdk -filename test.vmdk -rawdisk /dev/sda -partitions 8 -relative
VBoxManage internalcommands createrawvmdk -filename /home/roger/test.vmdk -rawdisk /dev/sda -partitions 8
-relative
RAW host disk access VMDK file /home/roger/test.vmdk created successfully.
You should execute this command as sudo or root. You should also start VirtualBox in the same way (regardless of your file permissions and ownership for the vmdk), because much like the mount operation, you need certain privileges to grab a device.
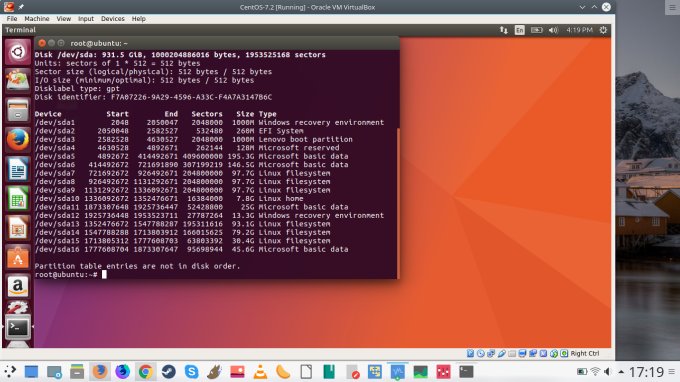
Notice the storage: 1TB disk, even though the Kubuntu partition is only 100 GB. This is because we're using raw disk access.
If you try without sudo or root, you'll get this ugly and not-so-helpful error:
Result Code: VBOX_E_FILE_ERROR (0x80BB0004)
Component: MediumWrap
Interface: IMedium {4afe423b-43e0-e9d0-82e8-ceb307940dda}
Callee: IVirtualBox {0169423f-46b4-cde9-91af-1e9d5b6cd945}
Callee RC: VBOX_E_OBJECT_NOT_FOUND (0x80BB0001)
UEFI features
There's more to it. What complicates things even more is that I have a UEFI system with a GPT disk layout. This means you will have to use a SATA controller for the disk, and also mount the ISO in the same way. Moreover, you will need to specify EFI in the virtual machine settings. When I say you, I mean me, because you should NOT be doing this.
Testing
Indeed, I was able to boot a virtual machine in this way easily. You can see the whole disk structure, there's no way around that. And now, it becomes the matter of a simple installation, and strong focus, so that nothing gets damaged or corrupted. But it does offer a way of placing new information onto a partition.
Technically, you can also boot a virtual machine, and then copy data from the expanded and mounted live media onto a hard disk. You can use dd, but we're really going into the realm of crazy and cool.
This is what we call Inception.
Conclusion
Think of the raw access as your strategic weapons. You never want to use them, but you're comforted by the fact they exist, and you can rely on them if you need to, come the rainy day. Instead, I believe organic in-vivo upgrades should be interesting enough, and then I have a few other, older test machines that will provide with the necessary entertainment during our distro escapades.
If you think about this, there's always a way. But I prefer to find a peaceful solution, which means trying to render the NVRAM writable again without breaking the laptop apart or risking everything on the disk. So, if you really, really, really must, raw disk access through virtualization offers a workaround. Now, we never use it. Take care.
Cheers.