Updated: January 13, 2012
This is a hot topic. You perform various installations and operations inside virtual machines using VirtualBox and you want to take screenshots documenting your activities. In the VMware range of virtualization products, the screenshot feature is present in the system menu, so it's a very simple thing of doing that. In VirtualBox, there is no such option available. This means you must resort to taking screenshots using the host utilities, like various screenshot programs, PrtScrn or Alt+PrtScrn, and other key combos. Not always simple, but the biggest problem is that VirtualBox treats a part of its interface as the guest operating system screen space. And thus, your screenshots never come out clean.
All right, all of this tells us what the problem is. You want to be able to take screenshots of your guest systems from the outside, without sharing folders and having to copy & paste screenshots from inside the virtual machines to the host. You want some functionality on your host that will take screenshots, excluding the inner VirtualBox border that affects screenshots. Can this be done? The answer is, yes, since version 4.0. Follow me.
Screenshots, today
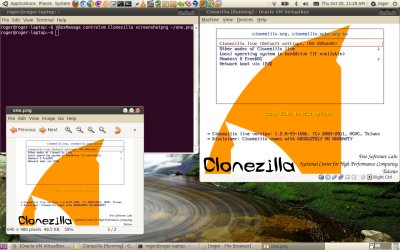
Whether you use SnagIt, IrfanView, GIMP, Gnome Screenshot, KSnapshot, or any other software, the results will always be the same. You will have that annoying top and bottom border that tells everyone you've just taken a screenshot of the VirtualBox window. For example, something like this:

This is annoying. You only want the blue rectangle, so you must manually crop the area, wasting your precious time. Now, there's a simple alternative, but it requires using the VirtualBox command line.
Solution: Use VBoxManage from commandline
The new feature is available in versions 4.0 and above, so this will not work on older editions of the software. What you need to do is invoke the following command:
VBoxManage controlvm <vm name> screenshotpng <filename>.png
That's the whole of magic, where <vm name> is the name of your virtual machine and <filename> is any string you want to use to identify your screenshots later on.
And here's a Ubuntu Lucid example:

Scripting
You can still partly automate this procedure, so you do not have to always manually go to the command line and invoke the desired command. First, you can create scripts that execute the command for you. I'll demonstrate using BASIC (BAT) on Windows and BASH on Linux. Second, you can use generic identifiers for images, so you don't need to manually input names every time. Using the environment variable RANDOM or the time stamp seem like good options. Finally, you can create shortcuts, either on your desktop or application panels and add hotkey combos that invoke the shortcuts or the applications.
Windows example
Using the command line in Windows may not sound like the most natural thing, but it's quite easy. Once you master the basics [sic], you can move on to writing batch files.

You can hardcode image names or use something that will create unique strings each time, either a time or date string or a random number. Then, you can write a simple batch file that will execute the command for you.
echo off
<full path to VBoxManage.exe" controlvm <vm name> screenshotpng <filename>.png
More specifially, using the example at hand, our Windows 8 guest. We create a batch file for our virtual machine that will append a random string to image names to make them unique. We place the images in Share directory, but you can use anything you like. Similarly, the virtual machine name can be treated as a hardcoded value or an input argument.
echo off
"C:\Program Files\Oracle\VirtualBox\VBoxManage.exe" controlvm Windows-8 screenshotpng
C:\Share\image-%random%.png
Lastly, you can create a shortcut, place it somewhere, then edit it's properties and add a shortcut key combo that will invoke it. This will make your work much easier and faster.


Linux example
On Linux, it's even easier.

We can create a simple script that contains only that one line.
#!/bin/bash
VBoxManage controlvm <vm name> screenshotpng ~/image-`date +%s`.png
exit 0
The end result will be images in your home directory, with the elapsed seconds count since 1970 as the appended number. Now,you can hardcode the virtual machine name in the script or pass it to the script as an input argument, but this requires interaction when executing. Or you could parse the process table and try to find the name of the current running virtual machine container to make a fully unattended script. You can also use the which command to detect the full path of the VBoxManage binary.
Then, you can create shortcuts. For example, in Gnome, add a custom launcher to the top panel, and in the command field write the full path to your screenshot script. And you will have an automated solution that is almost equivalent to executing a menu option and possibly even faster. There are many options, but this should get you started.
Another advantage
This method has another bonus that external utilities don't. It will grab the contents of the entire screen of your guest, even if it's only partially shown on your host monitor. So if you're using different resolutions for host and guest, multiple monitors or run your machines windowed, you won't get any annoying cropping. For instance, please notice this Windows 8 virtual machine. See the horizontal and vertical scroll bars? This means you are not seeing all there is to see, but the screenshot capture feature solves that problem.

Conclusion
There you go. You've just learned how to get around that one most annoying thing in VirtualBox, managing your virtual machine screenshots. With some use of the command line, you will be able to almost 100% automate your screenshot taking.
This tutorial focuses on VirtualBox and screenshots, but it also teaches a bit on how to think laterally, exposes the VirtualBox powerful command line management, how to use scripts, shortcuts and shortcut combo keys to make your life easier, including both Windows and Linux flavors, some BASIC, some BASH, works just fine. Well, I hope you liked it, have fun.
Cheers.