Updated: April 25, 2014
Today, you will read the most detailed and thorough installation guide for the Windows 8 family of products, which may include Windows 8, Windows 8.1 and others. If you stick all the way through, you will have gained all the knowledge, tools and confidence needed to master Windows 8.X installations. Or any operating system, for that matter.
Do note that some things may change over time as Microsoft perform updates and make changes in their flows and procedures. However, please remember that all Windows installs are nearly identical, going all the way back to Windows XP. Still, in order not to leave things vague, I have decided to write this tutorial, and elaborate on all the little problems and issues that may arise. Most of it comes down to disk management and making sure you do not destroy anything. But I'm getting ahead of myself. Follow me.

READ THIS FIRST!
You must invest time reading all of the stuff below BEFORE you begin an installation. Hate me if you will, but if you want to do it properly, then there's a whole lot of things you need to know before moving forward. There are no shortcuts.
Before we begin the installation in earnest, it is important for you to do some homework. Or rather, prework. The installation process can be very simple, or it can be very difficult, all depending on how well prepared you are.
In order to successfully install ANY operating system, you should be familiar and comfortable with several basic and intermediate concepts.
- You need to be able to backup your data.
- You need to be able to download installation image (say ISO file).
- You need to be able to burn the installation image to a media (DVD, USB).
- You need to be able to boot your system from DVD or USB.
- You need to be familiar with disk management and partitioning.
If all or some of these concepts seem alien, then you must invest some time in preliminary reading. It's painful, but less so than losing all your critical data, or finding yourself in a bad shape after the installation. We will discuss all of these shortly.
Windows installation types
Furthermore, there are several types of Windows 8 family installations that you can perform, and each one will dictate a slightly different approach to how you manage your existing data or prepare yourself for the installation process.
- New machine, preinstalled by vendor - nothing to do here.
- New machine, without an operating system.
- Old machine, an existing Windows operating system and a single disk and drive.
- Old machine, an existing Windows operating system and a single disk/multiple drives.
- Old machine, an existing Windows operating system and several hard disks.
- Old machine with non-Microsoft operating systems.
New machine, no operating system
This is the least risky installation type, because there is no data risk involved. To be able to install this host, you will need an external installation media, like DVD or USB, and some patience. But overall, it is fairly easy.
Things you will need
The following items and tools will be required:
Windows 8 installation image or disc. Unlike previous versions of Windows, the 8 family comes with a slightly different scheme. You must read my Windows activation guide that explains the new activation scheme, the storage of Windows keys in BIOS, and the use of the Windows System Builder edition for external installations.
Special notes
In most cases, people who have laptops and wish to reinstall them from scratch will not have installation media available. OEM builds usually ship without CD/DVD for backup and instead rely on hidden recovery drives. You cannot treat these laptops as baremetal installation types, nor can you expect to reuse old serial numbers available on stickers. Furthermore, if you are looking to reuse serial numbers from other Windows 8 installation, do note that OEM builds are not transferable, and that Windows 8 normally stores its serial key in the machine hardware.
Old machine, Windows installed, one hard disk & drive
In other words, you have Windows XP or Windows 7 or alike installed, all of your data is stored on drive C: and you know for a fact that you have a single hard disk inside your machine.
This installation will require a very delicate procedure. First, you will have to backup your data, see below. Second, you will have to decide whether you want to upgrade the operating system, start from scratch, deleting all existing data, or use both in tandem. The tandem arrangement is known as dual booting.
Upgrade (and reinstall)
With the upgrade procedure, in theory, you do not need to do much, except to let Windows do its own and replace the old system files with new ones. However, because this can fail, you should backup your data first.
It is also very important to differentiate between in-vivo upgrades and those performed with external installation media. If you run an upgrade from within a running operating system, the procedure will be much simpler, in that you will not need to worry about serial keys or partitioning. This will be similar to just running Windows update.
However, if you do run an upgrade from external media, you will need a new serial number that matches the new operating system. This is only possible with the System Builder edition.
If you are reinstalling, you can obtain these using Nirsoft ProduKey. More details about how to use this software are available in the Windows activation guide linked just a few paragraphs higher.

Start from scratch
If you decide to delete everything, the procedure becomes similar to the earlier use case, with the exception of data backup. We will elaborate on this shortly.
Tandem use
If you decide to try to use two operating systems side by side, your old Windows and your new Windows, then you will need to change the disk layout to allow that. This step is called partitioning. The exact details of how this needs to be done are explained at great length in the sections below. Remember, this is still a must-read section!
Things you will need
The following items and tools will be required:
You will need data backup. You will need to master the partitioning process and how it can be done. Lastly, you may have to adjust your BIOS or UEFI settings to allow other operating systems to boot from your machine. Specifically, you may have to enable or disable the secure boot option, if it exists, which is designed to prevent operating systems that have not been intended for your machine from booting. Normally, most desktop users will not encounter this issue. Laptop users may, and the implementation will differ from one vendor to another.
Special notes
Preinstalled laptops usually come with their own disk scheme, configured by the OEM. Usually, this includes one or more hidden partitions, some of which contain the recovery data for the operating system, allowing you to restore it to factory settings. Handling these layouts can be difficult. My recommendation is to start from scratch in these scenarios.
You may also have encryption enabled on your disks, which can cause partitions to be appear as junk, or to be unreadable. If this is the case, you might have to disable encryption before upgrades or partition resizing. This is out of scope for this tutorial.
Old machine, one hard disk & multiple drives
This is a somewhat easier variation of the above. If you have additional drives, like D:, E: or others, which you may be using for data storage, there is a) less chance for data loss during the installation of the new operating system b) you may choose one of these other drives as the installation target.
You will still need to take into consideration the type of installation you want to perform, whether it's upgrade, fresh start or dual boot. However, you may not need to do too much data backup or any disk management.
If you decide to use a different partition as the target, make sure it is a primary partition. Windows operating systems must use primary partitions as their target. If you do not know what a primary partition is, then you will have to consult my relevant guide. Yes, you guessed right, further below.
Things you will need
The following items and tools will be required:
Possibly some data backup and maybe some disk management.
Special case
If your system is using the GPT partition table instead of the more classic MS-DOS, you may not have to worry about the partition limitations and layout, but you might have to make necessary adjustment in BIOS or UEFI to account for that. Normally, Windows 8 should not have any problem booting from either one type.
Old machine, multiple disks and drives
This is the simplest case of a preinstalled host, because it gives you most freedom to do what you want. You may decide to use a second hard disk as your installation target for the Windows 8 family system. This way, you may completely avoid the need for data backup, disk management or partitioning. The only thing that may be required is to change the boot order of your hard disks in BIOS or UEFI.
Things you will need
The following items and tools will be required:
Access to the system BIOS or UEFI boot options.
Old machine, non-Microsoft operating systems
This probably means you have Linux installed, and now you wish to dual boot. While technically this is a more difficult scenario, the fact you have Linux probably means you have some existing knowledge and skill in how to manage disks and partitions. You will have to refer to my detailed how-tos on the subject written a few years back, but which contain the wealth of information you require.
Things you will need
The following items and tools will be required:
After installing Windows 8.X, you will have to fix the bootloader, because Windows rewrites the MBR with its own bootloader. So if you have used a non-Microsoft bootloader, you will have to repair it. And now, let's discuss all those other steps, tools and techniques.
Data backup
This is probably the most critical part of them all. If your data is intact, everything else is just the matter of some small technical hassles. There are two types of backups you should consider. One, data backup. Two, system imaging.
Data backup will take care of your files - documents, music, etc. System imaging actually allows you to take snapshots of your running operating system and then be able to restore them at a later date. This means that even if you effectively damage your installation, you can go back in time to a healthy point, as if nothing had happened.
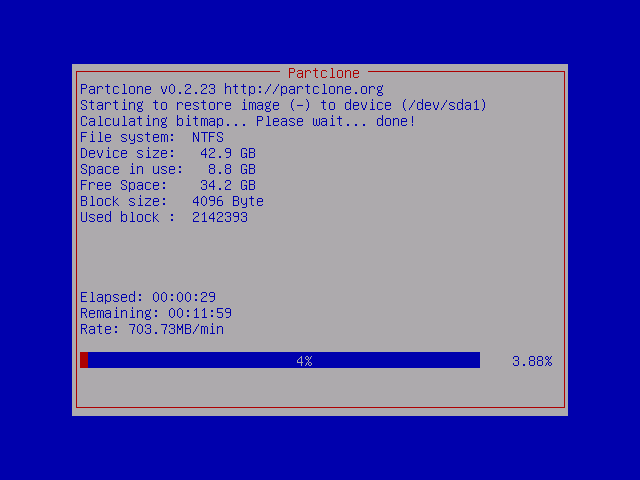
In order to master these two domains, you must read my backup strategy guide, which outlines the considerations for data backup, and the critical importance of having a well tested and verified plan. When it comes to system imaging, there are many tools available, but probably the best and most robust one is CloneZilla. My detailed tutorial on the topic explains both the backup and restore parts, with both Windows and Linux examples given in rich detail.
You should also check these fine Windows guides:
Free imaging software parts one and two
System recovery
Should things go horribly wrong, you should also be familiar with how to fix your Windows. There are multiple ways problems may occur, so you should at least have a passing knowledge of the following concepts:
Windows recovery tools - How to fix unbootable Windows images
Windows 8 recovery & reset - New features in the system restore and repair
Windows 8 safe mode - How to access the safe mode in this new operating system

Disk management & partitioning
This is the most important of this whole article. If you are comfortable managing your partitions, then the installation will be almost trivial. Knowing how to prepare your disks, plan in advance, and make changes as necessary is what is going to make your life so much easier. I cannot begin to stress the importance of this step.
The best way for Windows users to manage their partitions is - believe it or not - to actually use the Linux GParted partition editor, a tool that normally runs from bootable media, like a typical Linux live CD/DVD. My tutorial is super long, and it's not an easy read, but when you combine all the articles linked here, you will gain supreme knowledge, and you will be able to install ALL operating systems with ease.

Dual booting
This delicate procedure will allow you to run two or more operating systems side by side. Most people will need this if they decide to use Linux alongside Windows, but there's nothing to stop you from using two Windows versions at the same time.
I have an original article on how to achieve this with Windows XP and Kubuntu written back in 2007. A long time ago, but most of the information and suggestions are still 100% relevant. Then, I have a much newer article that explains the concept for Windows 7 and Kubuntu. It is 100% applicable for Windows 8, as well.

I most strongly recommend you read these two articles to fully understand all the considerations, especially related to early planning, data layout and configurations!
Last but not the least, please take a look at how I setup my real, production laptops. Both have come installed with Windows, and this is how I actually managed them, including installing from scratch, dual-booting and upgrading. Do notice that the Asus laptop also includes a Windows 8 to Windows 8.1 upgrade, which is currently beyond your knowledge, because you're here just to start the very first installation. But still, highly relevant and done with real data. No games or testing. Production hosts.
My HP laptop setup
My Asus VivoBook setup
Windows upgrade on the Asus ultrabook


Bootloader
Should you decide to use more than one operating system at a time, especially Linux, you will have to handle the bootloader, the little piece of code that tell your machine where to look for the default operating system and initialize it.
I have two extremely extensive guides explaining the bootloader concepts with the most popular Linux bootloader, GRUB, both legacy and the more recent version 2.00. While most Windows users may not find immediate use for these, the understanding and knowledge is critical if you intend to boot more than one instance of any operating system.

Previous installation guides
Now, in order to learn how it was done before, then you are most welcome to take a look at my older installation tutorials, focusing in Windows XP, Windows 7 and several flavors of Linux. Again, very much relevant, because all of these guides elaborate on the needs and practices for smart disk management. You learn how to prepare your setup before you commit data, and that includes partitioning, a whole range of usage scenarios and more.
Windows XP installation & setup guide
Windows 7 installation guide
Ubuntu install guide

And now, we install Windows 8!
Windows 8 installation, step by step
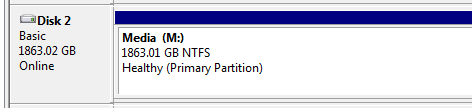
I am going to demonstrate the following: We will install Windows 8 on a host that has two hard disks. There is an active Windows XP installation on a smaller 10GB disk. There is a 40GB unallocated space on the larger 40GB disk, which was previously used for data.
We will first go into BIOS and change the boot order so that the larger 40GB disk is selected first. Then, we will boot from the Windows 8 media and perform the installation. We will have to be careful and pay attention to the correct disk selection, which is the most critical part of the whole procedure.
This scenario is quite useful because it simulates a situation where a user might have an older installation, which they may desire to keep around for a while, plus one or more data drives located on the same or multiple disks. These additional drives are most often primary partitions, making them suitable candidates for the installation of any Windows version.
We will not be upgrading the older Windows XP installation. We will go for a tandem setup. Moreover, we will not be shrinking or resizing existing partitions in this exercise, but we will address the topic. Finally, you will have to consult my earlier guides on the topic, including the dual-boot tutorials.
Language and other preferences
The installation begins with the selection of the language, time and currency format and the keyboard. Once you are satisfied with your selection, hit Next.
Hint: If you are using Wireless keyboards, they may not work. You might need a wired one. Moreover, sometimes, due to the lack of drivers in the Windows 8 installation media, for your specific hardware, front panel USB-connected ports, especially 3.0, might not immediately work. Hook them up into the back panel.

Next, hit Install Now.

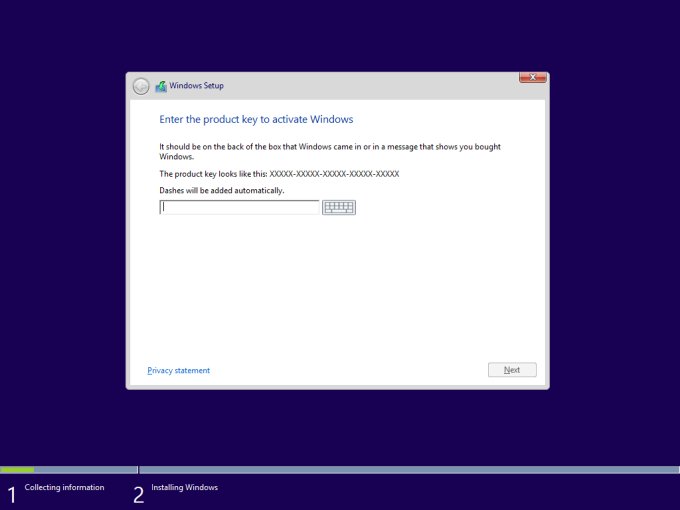
Serial key
The next step is to provide a serial key. This will only be possible if you have purchased a System Builder edition. For other types of upgrades, this will not be necessary. If you are reinstalling a system with the same version of Windows, then you can retrieve the serial from BIOS/UEFI using ProduKey.
License agreement
Next, you must agree to the terms of use:

Installation type
Now, you need to decide what you want to do. Upgrade will only work if you have another version of Windows installed, and you wish to keep the files and settings. Custom installation means you will start from scratch.

Wait, but we already have Windows XP installed! Yes, we will not touch it, but we will also not be upgrading it. Therefore, we do need the Custom type, but we will have to be careful when selecting storage space.
Where to install (CRITICAL)
Please pay careful attention to all the stuff discussed here!
Now, this is the one important part. Here, you need to decide where to install Windows 8. And if you master this step, everything else is trivial. Notice the layout we have. We have Drive 0 (first disk, count from zero), unallocated 40GB space. Then, we have Drive 1, with Partition 1, with a total size of 10GB, which only has 2.9GB free space, and it is a System type. This is our XP install.
Then, on the second disk (Drive 1), we also have 10MB unallocated space, but that is of no interest to us. So what now? We could potentially select Drive 1 Partition 1, but the size is too small, and that would mean ruining our XP installation.
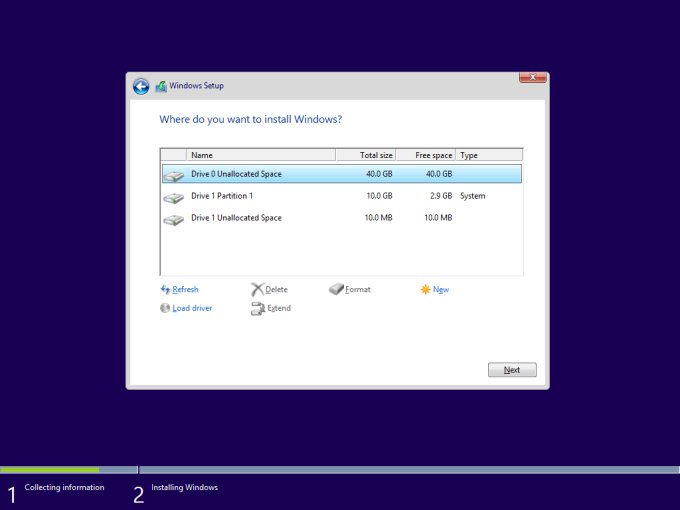
We can select Drive 0, and that's good enough. Windows will automatically configure partitions for the installation. You can also manually create partitions, format them, extend existing ones, and so forth. It is highly recommended not to use the Windows partition manager and go for an external utility like GParted. You should do this before the installation, and after you have safely backed up all you data.
Normally, Windows 7 and above will create two partitions, one Reserved partition that will contain critical system files, needed for recovery, totaling 100MB, and one large System partition, which will be used as the installation target. Later on, this will be your C: drive.
This is the default for most people, but you should consider additional drives, like D:, E: and others, for your data. Having separate data drives is always a good thing. It makes backups simpler. And it also increases the chance of preserving your data between upgrades. It also means less likelihood of losing data when performing installs.
To wit, other scenarios
In addition to what we have just discussed above, let's also briefly ponder on some other use cases. This is will give you more confidence in making the right choices. The chief consideration is having separate data drives!
Here's a warm recommendation, if you plan on preparing a multi-boot system for a Windows 8 installation, then you should probably do the following. Let's assume you have a 1TB disk.
- Leave 100GB free space at the beginning - Windows will create its own two partitions here during the installation.
- Create an Extended partition for the rest of the space, from 101GB to 1000GB.
- Create multiple logical partitions for data and/or other, non-Microsoft operating systems.
But what if you system is not configured for this kind of setup? What if you have a 1TB disk, and it only contains a single partition, which appears to be the drive C: inside an old Windows XP installation? Then, you will have to do the following:
- Resize the Windows XP partition to a smaller size, e.g. 500GB. This may or may not be possible depending how much free space there really is. But let's assume that your 1TB drives is 34% full. Perform the resizing procedure using GParted.
- After resizing, you will be left with 500GB free space. You can use this for the Windows 8 installation.
- Alternatively, you can leave 100GB free space, from 500GB marker to 600GB marker, and use this as the free space target for Windows 8 and its core files only. Then, from the 600GB marker onwards, create an Extended partition, which will then contain multiple logical partitions for data or other operating systems.
Visually, it may looks like something like this (numbers in GB):
Before:
-----------------------------------------------------------------
0 100 200 300 400 500 600 700 800 ...
| Windows XP Drive C: |
After:
-----------------------------------------------------------------
0 100 200 300 400 500 600 700 800 ...
| Resized Windows XP Drive C: | Free | Extended partition |
- Free will be used as Windows 8 target
There may be many other possible layouts and use cases. Please consult my two dual-boot guides, the GParted guide, as well as the other installation tutorials for more details, careful planning, and other considerations.
Some questions and answers
Why only 100GB for Windows 8?
This is more than enough for its core files.
What if I do not want to use GParted, what if I want Windows to resize?
This can also be done. But it is more cumbersome. Take a look at the screenshot above, where we have 40GB free space. You can click New, and create a 20GB target. Then, repeat and create another, which will be your data drive (e.g. D:). Select the first 20GB partition for your install. But then, you will not have the Reserved partition available. It's not a huge problem, but some people might be more comfortable that way.
What if I accidentally delete or format a partition?
Stop right there. You might want to take a look at my Linux recovery article. Yes, Linux. This is your best bet to restore the data, in case
you have not performed any backups.
Installation in process
After this step, Windows will take 10-40 minutes installing.


Personalize
Now, the relatively easy part. Once Windows 8 is installed, you will do some customization. At this point, there will be no more changes to your disks and drives. The first step is to choose a background color.

Settings
The next step is Settings. You can go for Express configurations, but I recommend you do Customize.

Decide whether you want network discovery enabled. This means you will be able to find other hosts, compute devices and things like printers, on your network. This option should be used for home or possibly work setups.

You can then also configure the Windows Update. The default setting is to automatically download and install them. I would suggest you choose the notify option.

Then, you can tweak the help and error reporting options. Some aspects of this step will also affect your privacy. For example, you may not want Microsoft to get information on how you use your system, report performance and usage patterns, or your location.


Account setup
This is another important step. By default, Windows 8.X will suggest you use an online account to login into your system. If you do not want to use an online account, or do not feel comfortable with this idea, you can use a local account.

Click on Create a new account at the bottom. In the next menu, skip the section that reads Create a Microsoft account, and click the small link that reads Sign in without a Microsoft account.

Then, configure a standard, local account without online integration.

Finalize
Now, the installation will complete.


Installation complete
And you're done! Congratulations.


Additional customization
Now that Windows 8.X is installed, you should consider making some extra changes. The first thing is restore the system menu and avoid using the Metro slash Modern interface, which comes with that tiled Start Screen. You can accomplish this by using a product like the most awesome Classic Shell, for instance.
You should also invest some more time reading about how to perform local account setup on a system with an active online account in place, how to enable or disable the Windows Defender, as well as how to tame Windows 8.
On the security front, you might want to use the superb Microsoft EMET utility. While some security mitigations are already built into the Windows 8 core, having the fully featured tool should help you gain extra control over your applications.

Personal recommendation
After you have read all through this document, I would personally suggest you do not use Windows 8.X, at least not until you get an option to have a proper Start menu available by default. This is currently sort-of happening, and will happen in the future, so you should stay tuned for updates.
Meanwhile, you might want to read my initial impressions of the Windows 8 family by reading my reviews, both the Consumer Preview and the Enterprise Preview articles. You should also carefully check my Asus VivoBook review, as well as my experience with the upgrade from 8.0 to 8.1, with a notable focus on the local versus online account issues that I encountered. Scroll up, if you haven't already.
Conclusion
There you go. As promised, this is the longest, safest and most thorough Windows 8.X installation guide, and this from a Linux guy who does not even like this one particular version of Windows. Imagine that.
This tutorial teaches you everything you need to know, from early preparations, how to master your data, how to manage your disks and partitions, to the installation itself, plus additional customization, and a wealth of other data and pointers. All of what you need for happy and sane computing. Most importantly, the guide is generic enough to serve you well no matter what operating system you try to use. I hope you liked this article. We're done here.
P.S. If you find this article useful, please support Dedoimedo.
Cheers.