Updated: April 27, 2022
Today, I'd like to break away from my recent template of Windows-to-Linux tutorials, which have focused on showing you how to install, configure and use a variety of programs, typically designed or intended only for Windows, using frameworks like WINE. What we shall discuss today is the juicy topic of disk and drive management.
Beyond applications, there's data to reckon with. And data is critical to everything. Things become extra complicated when one considers the cardinal differences between Windows and Linux. The former uses NTFS, and data is organized in drives (C:, D:, etc). Linux stores everything under one filesystem tree (root, /), and uses different filesystem formats (like ext4), although it can handle NTFS. So then, what gives if you're trying to move your stuff over? This tutorial is a neat suggestion for those looking for order, simplicity and clarity.
Preliminary reading
This guide cannot live in isolation. There are some hard laws of physics we must obey. First, if you don't know anything about disk and/or drive management, filesystems and alike, this article is not for you really. You do need a basic foundation of these principles. Let's be realistic. This article is for nerds, albeit those with little practical experience in Linux (just yet).
That said, here are some articles of mine you should peruse before delving any further:
GParted partitioning software tutorial
The ultimate Linux guide for Windows newbies
Same same but different
All right, now that we know the lingo and the technical details, let's discuss a scenario. Say you have a Windows machine with two physical disks and a total of five disk partitions. Let's assume the layout is as follows:
- C:\ drive - Windows and core operating system files, program files, user data.
- D:\ drive - Games installation (including say Steam).
- E:\ drive - User's data (files, movies, music, documents, etc) NOT stored under My Documents and alike.
- F:\ drive (on the second disk) - Used for backup; here, the user data is copied once a week.
- H:\ drive (on the second disk) - Used for unimportant stuff (downloads, raw videos, etc).
Now, let's assume that the owner of the computer with the following disk arrangement is interested in moving to Linux. So what they do is as follows:
They repartition their disks - specifically, they shrink the H:\ drive, and then create a number of new partitions in the freed (and now empty) space. They then install a Linux distribution here. Now, they run a dual-boot system, and when they power on the computer, or restart it, they see a menu that allows them to choose whether to continue into the Linux or Windows environment.

As you can see, I've outlined this and rather similar scenarios in my various dual-boot articles, like the one linked above, as well as the Windows 7 & Ubuntu and Windows 7 & CentOS guides. This should give you a good reference point for a similar adventure, as well as allow you to get a sense of what the initial differences in disk management in Linux would look like.
Now, the user has a system with two operating systems. However, there is a problem. The bulk of the data still resides in Windows and/or is saved/kept on Windows drives, formatted with the NTFS filesystem. There are several questions here:
- Can the user access the Windows data?
- Can the user modify the Windows data?
- Can the user migrate the data from Windows drives into the native Linux filesystems on other partitions?
- Can the user convert (if they want to) NTFS filesystems to native Linux ones?
Let's answer these, then, shall we!
- Linux can read NTFS filesystems without any great issues. Most distributions support this natively.
- Similarly, Linux can write to NTFS filesystems. However, not all distributions have this capability out of the box. The solution to this problem is to install the NTFS-3g utility, which offers the necessary functionality. For instance, in Red Hat distributions like CentOS or AlmaLinux or Rocky Linux:
sudo dnf install ntfs-3g ntfsprogs
- The user can migrate the data, however in the above scenario, there might simply not be enough room available on the newly created Linux partition(s) to accommodate all of the Windows stuff, including the data, backups, and other bits of information.
- The conversion of filesystems is a risky operation that can lead to a data loss. It should never be done without a complete, verifiable data backup in place. But for that matter, if you have a backup in place, you might as well format the partitions with the native filesystem and copy the data over.
Disk management opacity
The solution to the scarcity of disk space and/or easy data migration path is then to present the Windows data inside the Linux system, but in a manner that will be easy to discern, as well as allow practical data backups. To explain what I mean, consider the following:
In Linux, all paths resolve to one root (/). For instance, /home/igor would be the mount point to the home directory of the user named "igor". But the physical mapping of that directory can be anywhere. It can be a different partition, a different disk, even a different system (on a network). For instance:
- The root filesystem (/) is a mount point for /dev/sda1 (the first partition on the first disk).
- home/igor is a directory and not a separate mount point. The data resides on /dev/sda1 (the same disk).
- Alternatively, the path /home/igor could resolve to /dev/sda2 or /dev/sdc7 or even NFS, CIFS or Samba shares.
This means that if a user mounts Windows drives, they will be presented in Linux as part of the single root filesystem, and they won't necessarily be discernible from other locations or paths. Again, for example:
Most Linux systems will mount removable, external or non-Linux devices under /run/media or /media. So if you see two directories under these locations, however named, you won't necessarily be able to distinguish between them. One could be an internal Windows NTFS-formatted partition, and another could be a FAT32-formatted USB drive.
The solution, then
To work around this problem, I use the following method:
- I create a new top-level directory under root called drives (/drives).
- Inside, I create directories that will serve as mount points for Windows drives, with letters as identifiers. For example, /drive/C will be used as a mount point for the C:\ drive, and /drive/E will used as a mount point for the E:\ drive, and so on.
- I create permanent mount rules for Windows drives under /etc/fstab (more on this shortly). This means that when the system boots, the Windows drives will be mounted as writable devices and presented as directories under the top-level /drives location.
What does this method ensure?
There are many useful benefits to this approach:
- It allows for a clear and visible separation between Linux-only or pure Linux paths and Windows paths.
- It does not mix all non-Linux devices/partitions under generic directories.
- Running backup scripts ensures that not everything is copied or backed up, but only what you need. If you're doing a full backup of your Linux system, and you have other filesystems and drives mounted, you don't necessarily want them included in the backup, and you don't want to have to account for every "unknown" path.
Here's how you can do it
Following our earlier example, the first step is to figure out how Linux "sees" the internal hard disks and how it identifies the Windows drives. Again, you need a little bit of expertise here. You can use the command-line tools like fdisk to output the list of devices and their partitions. Let's assume the following:
- /dev/sda1 - C:\ drive
- /dev/sda2 - D:\ drive
- /dev/sda3 - E:\ drive
- /dev/sdb1 - F:\ drive
- /dev/sdb2 - H:\ drive
- /dev/sdb3 - Linux root (/)
- /dev/sdb4 - Linux swap
- /dev/sdb5 - Linux home (/home)
Create the /drives top-level path and the directories underneath (for Windows drives only):
sudo mkdir /drives
sudo mkdir /drives/C
sudo mkdir /drives/D
...
Now, as root or sudo, create a backup of the /etc/fstab file and then edit it in a text editor (like nano):
sudo cp /etc/fstab /home/"your user"/fstab-backup
sudo nano /etc/fstab
In the text editor, add mount points to your Windows drives.
/dev/sda1 /drives/C ntfs-3g defaults,locale=utf8 0 0
/dev/sda2 /drives/D ntfs-3g defaults,locale=utf8 0 0
...
What do we have here?
- We specify the actual device/partition that we want to mount.
- We specify the mount point.
- We specify the filesystem - in this case, we use the ntfs-3g filesystem driver (gives us read/write access).
- We specify the mount options - keeping it simple with defaults, plus UTF8 encoding.
- We set the last two fields (dump and fsck) to 0, so they are excluded from classic Linux operations.
Here's an actual example from one of my systems:
# <file system> <mount point> <type> <options>
<dump> <pass>
# / was on /dev/nvme0n1p5 during installation
# /boot/efi was on /dev/nvme0n1p1 during installation
UUID=7f4087e7-e572-44fd-a4a1-7489099937a0 / ext4 errors=remount-ro 0 1
UUID=C05A-951D /boot/efi vfat umask=0077 0 1
/swapfile none swap sw 0 0
/dev/nvme0n1p3 /drives/C ntfs-3g defaults,locale=utf8 0 0
The first three uncommented entries are mount entries for Linux filesystems, including the root (/), /boot/efi, which is required on UEFI systems (it also shows a VFAT filesystem), and a swapfile rather than a swap partition.
The fourth entry is the addition of a Windows drive. Please note that the device identifier isn't /dev/sdaXY but it is instead /dev/nvmeXnYp3. The reason for this is the system has an NVMe hard disk, and the Linux system identifies it differently from the IDE/SATA/SCSI devices. But for all practical purposes, the notation is the same.
What we have is a first (0) NVMe bus, first (1) device, third (3) partition. Again, please refer to my guides on hard disk management earlier, as well as the GRUB tutorial, as the notation for devices and partitions is different. And so, in the example above, we mount our Windows partition, effectively the third partition on the NVMe disk, under /drives/C.
You don't need to reboot to see the effect, simply remount everything:
sudo mount -a
Now, your Windows drives will be mounted to the corresponding paths, and you can see the data. The next step is to make the mounted data easier to use and access.
File manager & Windows drives
If you want to use the data from GUI (not command line), you can do the following trick:
- Create symbolic links in your home directory to the mounted drives.
- More specifically, symbolically link each drive (letter) to a folder that has a meaningful identifier, like the Windows drive names.
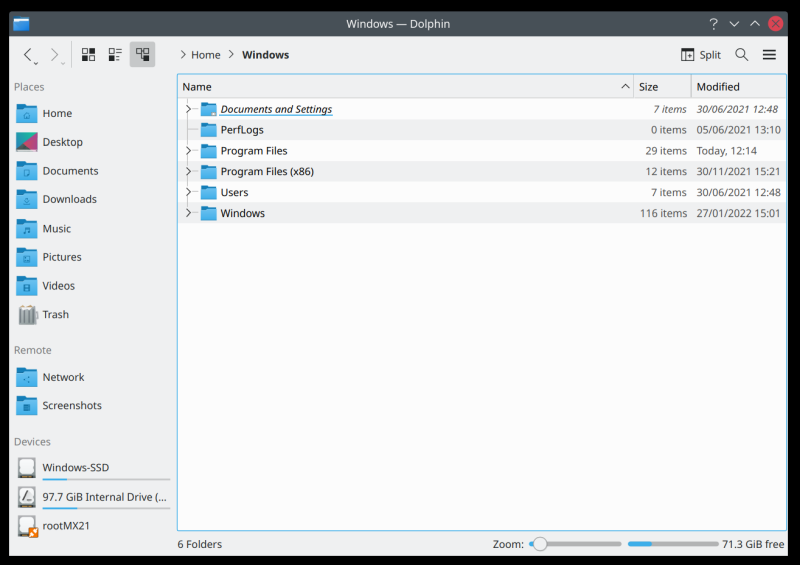
ln -s /drives/C ~/Windows
The command above will create a symbolic link in your home directory. Windows will map to /drives/C, which is the mount point to the C:\ drive. So when you click on the Windows folder in your Linux file manager, you will see the contents of the Windows drive.
Now, you can go one step further and create shortcuts to these drives. For instance, in the Plasma desktop environment, you can add shortcuts to the sidebar, so Windows will map to /drives/C, Games will map to /drives/D, Data will map to /drives/E, and so forth. Your next step is to potentially add backup tasks into the flow, but that's a topic for another tutorial.
Conclusion
My tutorial isn't the holy grail of data management. Far from it. But it does provide elegant suggestions to common problems people may face going from Windows to Linux. It provides a way to present the Windows data in a visible, intuitive manner. It does not include any destructive operations. It allows for convenient backups and data separation. And it offers people used to the Windows workflow to slowly adjust to the new environment without compromising on familiar clues or established workflows.
With the Windows-only drives mounted in their own path, symbolic links to give you convenient access via GUI tools, and a logical mapping, you now should have a good, solid foundation for your migration. The next step is to make sure your important data is backed up. Because data without backups is just tragedy waiting to happen. We will cover that, as well as many other practical day-to-day tips in follow-up articles. For now, ponder a little about the data scheme I outlined above. And stay tuned for additional program setup guides. See you soon.
Cheers.