Updated: January 3, 2009
This is the third article on virtualization. And probably the most difficult one. So far, we have had DirectX support in VMware products and OpenGL support in VirtualBox, in both cases available only for Windows guests. The choice of the host platform did not matter. But what about Linux guests?
I thought this was not meant to be. But then, I read an article on linux.com, showing how 3D can be enjoyed on Linux guests, using an application called VMGL. It looked more than promising. It looked great; but it also looked difficult. This was no mere 5-10 minutes of hacking. The task was a big one. So, I've decided to see if this can indeed be done.
And the answer is ...
The answer is: When you see an article / tutorial / guide / how-to that uses the phrases like "it should work" and "all you have to do is ..." - be warned! You're in for a lot of trouble.
The original article, as well as the author's application documentation, fail to take into account about 90% of dirty work that you'll have to do just to get close to your goal. In this tutorial, I'm going to show you all the grisly details that are involved in (maybe) getting your 3D to work in Linux virtual machines. P.S. You can read more in the first two articles:
3D acceleration in virtual machines - Part 1: VMware & DirectX - Tutorial
3D acceleration in virtual machines - Part 2: VirtualBox & OpenGL - Tutorial
VMGL: OpenGL 3D acceleration - the uncut version
We'll begin with VMware Server and then try the same on VirtualBox.
Installation
Downloading the packages and installing them is easy. They are in RPM format, so if you're running Debian-based distros (like Ubuntu), you'll have to install the alien package first and convert the RPMs to DEBs. So first, install alien:
Then, convert the RPM packages to DEB:
Finally, install them:
or
dpkg -i package.deb
Substitute the generic names for the actual VMGL packages and install them, once on the host and one on the guest.
Note: When installing the RPMs/DEBs, you will see no (visible) errors. However, trying to install using the sources proved to be a complete mess. You'll have to satisfy an abundance of dependencies, including all build-essential packages - gcc, make, kernel source, kernel headers - plus many others, like imake, python and opengl headers.
Unfortunately, the author does not bother to give you a complete list of required dependencies, so you will have to guess, by trial and error, what you may or may not need.
And the source seems utterly broken:


And on the Ubuntu guest:

It is quite likely you will give up at this stage. But if you used the RPM/DEB packages, you may think everything worked out, so you proceed ...
Load module
Your next step is to change the xorg.conf file. Add a section like this:
Load "vmglext"
EndSection
Restart the guest X windows (Ctrl + Alt + Backspace) for changes to take effect.
Start Xvnc server
Next, in the guest, launch the modified Xvnc server that is supposed to do all the magical OpenGL tunneling for us.
Ah, here comes the tricky part. Since the author used an antiqued version of the server, for an unknown reason, except most likely that he used whatever they used at his university, it will fail to work on modern distributions, because it assumes locations of files and folders that are not present on modern distributions.
Both on SUSE 11.0 and Ubuntu 8.10, I had to perform quite a bit of hacking to get the server running without any errors. You will get lots of errors, something like:


This is what happens when 2003 packages are used to create the application. Luckily, the solution is "simple." So, to fix the problem:
Download rgb.txt
That's our first error. Find the file somewhere on the Internet (google it). Download it and place it where the package expects to find it. In the file itself, delete any empty lines, because they will throw up syntax errors.
Place the file where the Xvnc server expects it - or better, place it under /etc/X11/rgb.txt and create symbolic links:
sudo ln -s /usr/share/X11/rgb.txt
cd /usr/share/X11
sudo ln -s /etc/X11/rgb.txt
So it looks like this:

Looks ugly, and it is!
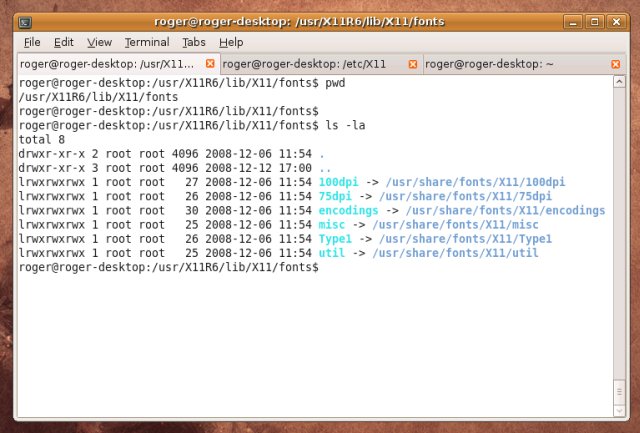
Your next step is to create symbolic links for all those missing fonts, too.
sudo ln -s /usr/share/fonts/X11/100dpi
sudo ln -s /usr/share/fonts/X11/75dpi
sudo ln -s /usr/share/fonts/X11/encodings
sudo ln -s /usr/share/fonts/X11/misc
sudo ln -s /usr/share/fonts/X11/Type1
sudo ln -s /usr/share/fonts/X11/util
And then you get:
Now, when you start the Xvnc server, you will STILL get errors, but this time, it will work:

Now, on the host, run the vncviewer. Needless to say, the guest should have an IP address that is reachable from the host. Which means you need either bridged or NAT networking for the guest virtual machines.
It will look thusly:
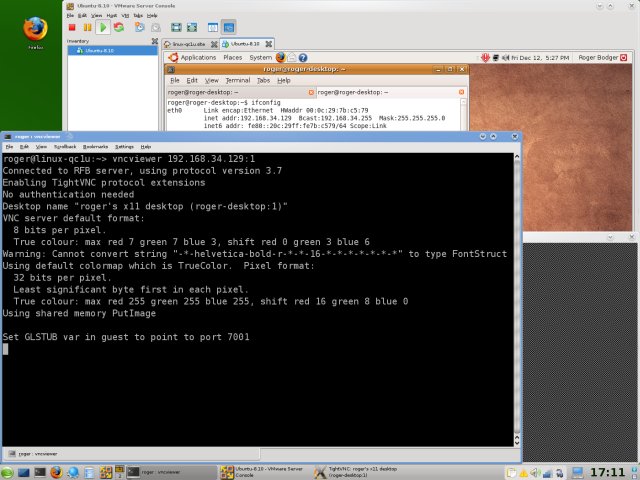
On the guest, export the GLSTUB:
In our case, we see that GLSTUB points to port to 7001. And our guest IP address is 192.168.34.129, so we will export GLSTUB like this:
And now, magic! Everything should work.
Um, only it does not. Running glxinfo does not show vmglext driver in use and running glxgears as suggested shows the same abysmal performance as before. Which is not surprising, considering the broken packages.
Redo everything in VirtualBox
I thought VMware Server with NAT and its proprietary code was the issue. So I tried the same trick, using a Ubuntu host, running VirtualBox OSE edition, with a Ubuntu guest. I also configured Bridged Networking to make this work.
While configuring bridged networking is not specifically related to the topic at hand, here's the handsome set of commands you'll have to run to get the host and guest communicating. For more details, you may want to read:
VirtualBox - Community Ubuntu Documentation
So here's what I did (may not exactly reflect your needs / configurations):
1. Install bridge utilities on the host
The first step is to install bridge utilities, so we can bridge our network interfaces and share IP addresses.
2. Declare bridge in network scripts
After the bridge utilities are installed, you will have to declare it in the network configuration file. On Debian-based systems, as demonstrated here, the configurations are kept in a single file, /etc/network/interfaces. RedHat-based distros used individual configuration scripts for each network adapter separately.
P.S. Please use a static IP address of your own choosing.
Add to above file:
auto br0
iface br0 inet static
address 192.168.3.100
netmask 255.255.255.0
gateway 192.168.3.1
bridge_ports eth0 vbox0
3. Declare virtual network adapter for VirtualBox
This will allow VirtualBox to use your br0 bridge:
Add to above file:
vbox0 <your user name> br0
4. Restart network and VirtualBox drivers
After the changes are added to the configuration files, we need to restart both the network service and VirtualBox for the changes to take effect.
sudo /etc/init.d/virtualbox-ose restart
5. Hack a file here and there to get the right permissions
You may need to change permission to network tunneling devices so that VirtualBox can also use them. This is done like this:
sudo chmod 666 /dev/net/tun
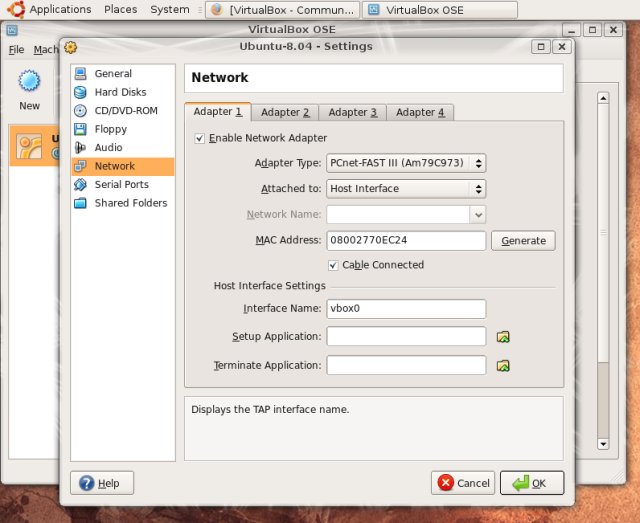
6. Configure guest to use the vbox0 virtual adapter
This is done on the host machine, by accessing the Settings menu for the relevant virtual machine. Here's a lovely screenshot:
7. Power up guest and assign static IP address
This address should belong to the same subnet like our bridge. In other words, simply increment the last octet by one.
In our case:
sudo ifconfig eth3 192.168.3.101 up
8. Repeat all of the steps we did earlier
Go back to the beginning of the uncut version and run the entire setup again. And again, it won't work. Magic?
Conclusion
As it turns out, enjoying 3D acceleration on Linux virtual machines is beyond 99.999995% of users, including knowledgeable geeks like me. The project, apparently someone's PhD, does feel like a true academic work: it's half-finished and it's unusable by normal people.
What beats me, though, is the claim that "you should all be set" after only a few minor hacks, as if we're talking cups of fresh morning dew. And the five-minute hack turns out to be 3-4 hours of misery. Why, on Earth, would someone use a 6-year old version of the Xvnc for the task?
However, I think what really annoys me the most is the fact someone actually released a product in such a shabby state. A shame. Well, not all is lost. We've had 2 out 3 working. VMware support for DirectX in Windows guests and VirtualBox support for OpenGL in Windows guests proved to be gems.
But lament not! VMware and Sun are big shots in the virtualization industry. It is only a matter of time before 3D acceleration becomes a happy reality for Linux users running Linux guests.
When all things are taken into consideration, the need for Linux host / Linux guest 3D acceleration seems less important. Windows users will probably only use Windows. If and when they need Linux, they will most likely dual-boot. Linux users will most likely want Windows guests, so they can use the legacy applications they need, and for this they already have a solution (or two). The Linux-in-Linux virtualization is a wicked idea, but it is not a priority with most people. It will happen. Mark my words.
To wrap it up, let's review what we did so far. We learned a few valuable lessons in this series of articles. We learned how to use VMware Server and VirtualBox so that we can enjoy 3D acceleration in our Windows guests. We learned a few more cool hacks and tricks along the way. Most importantly, we learned that desktop virtualization is in continuous evolution, taking us further in our goals and desires.
Cheers.