Updated: July 31, 2026
I come to you with a weird little problem, one that I thought should have been resolved many many years ago, but apparently, no. As it happens, I have some old DVDs, and I wanted to back up their contents before the discs fade beyond repair. All right, so you need some program that can do this. As always, I start with VLC, my favorite go-to software for all things media, alongside ffmpeg, that is. I've used VLC for many wondrous things, including a subset of what we will discuss today. Indeed, I wanted to back up a video that has multiple audio and subtitle tracks available.
As I outlined in my VLC & subtitles tutorial, you can do this quite easily. But then, I noticed that there was quite a bit of discrepancy between conversion, stream, and the method by which you select the necessary audio and subtitle tracks. Namely, when using the conversion option, VLC ignored the GUI-selected tracks and chose randomly. The streaming option worked fine, but not on the command line. The exact same settings that worked well in the GUI did not when I invoked the program in the terminal window. Thus, I would like to give you what I hope will be a rather precise and definitive guide on how to handle this "problem", script your data conversions, and avoid any errors. Let's begin.
Select correct audio and subtitle tracks
Let's start with the conversion option. When you choose your source for conversion, you can also use the GUI to choose the desired audio and subtitles track. If you tick the "Show more options" checkbox, it will display how the selected tracks are reflected in the VLC parameters.
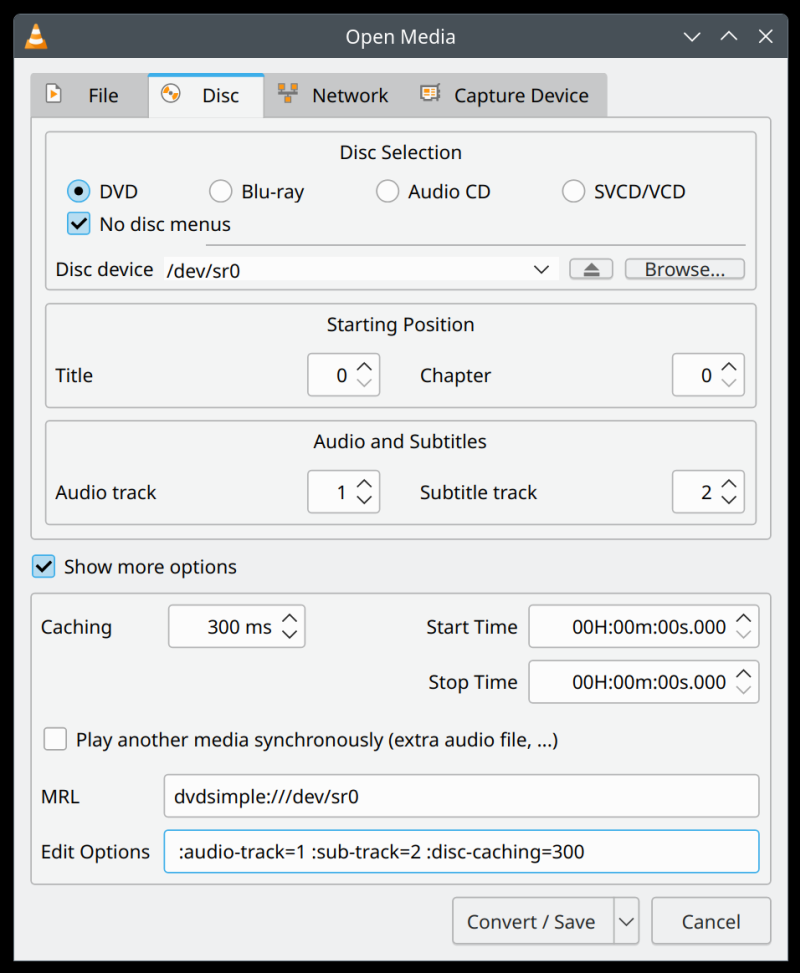
Namely, the options will be shown as:
:audio-track=[number] :sub-track=[number]
Choose any number as you please, from the available list of audio and subtitle tracks, of course. Indeed, when you play your content in VLC, you can then select the desired one, and here, the listed numbers will match the languages, as shown inside the player. This ought to work, but, from my experience, it does not. The conversion would randomly pick tracks, ignoring my options.
Streaming method
Let's use the streaming method. I've already outlined how you can do this. First, select your source. In this case, we have the DVD, but it can be anything. In my example, the source is /dev/sr0. You also want to specify the starting position. This can be, say, track 1 or 3 or similar. For instance, in the MRL field:
dvdsimple:///dev/sr0#1
If you also want to specify the end of the range, then you can do as follows:
dvdsimple:///dev/sr0#[first]-[last]
If you want to convert only a single track, then the starting and the ending position will be the same:
dvdsimple:///dev/sr0#3-3
Now, you can simply skip to the last step of the streaming wizard that reads "Generated stream output string". Here, you can manually specify the destination file, as well as any other options. If you want to embed the subtitles, use the soverlay option (as outlined in the tutorial earlier).
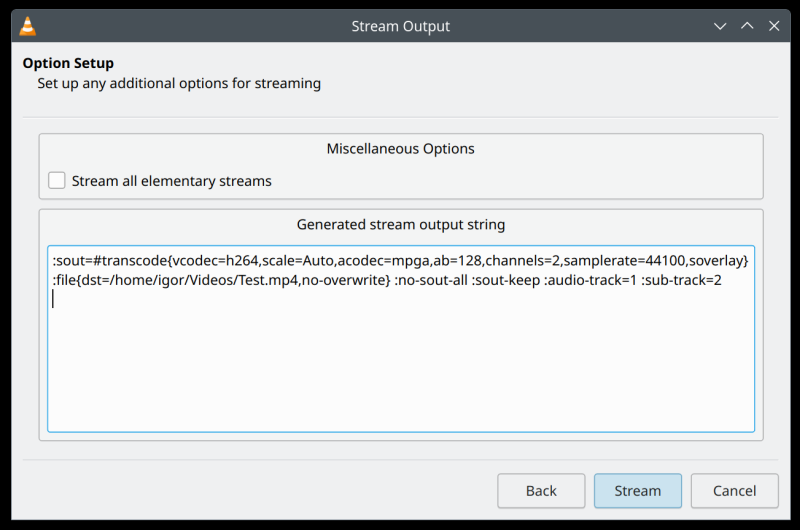
The text in the example above reads:
:sout=#transcode{vcodec=h264,scale=Auto,acodec=mpga,ab=128,channels=2, \
samplerate=44100,soverlay}:file{dst=/home/igor/Videos/Test.mp4,no-overwrite} :no-sout-all
:sout-keep :audio-track=1 :sub-track=2
What do we have here?
Let's break it down:
- I specify a long set of transcoding options. But please note, the choice of the codecs is not the important part here, at all. You can choose any which one. You could also do without any transcoding, video or audio.
- I choose h.264 as the video coding, automatic scaling and resolution.
- I choose mpga as the audio codec, with the 128Kbps rate, sample rate of 44100 Hz and stereo. You could also try 5 or 7 channels, if the source supports that, for instance.
- I overlay the subtitles without specifying any conversion or rendering (scodec).
- I set the destination file, and I use the MP4 container. You can choose anything you like, but remember that some file containers have limitations, say like no embedded subtitles. VLC lets you review these options when you go through the wizard.
- I use the no-overwrite option so I don't destroy any existing media.
- I do not output all of the elements contained in the original (source), as I do not need them.
- I set the desired audio and subtitle tracks.
Very importantly, please note, I moved the samplerate option to the next line for readability, but there should be no line break or any spaces between channels=2, and samplerate=44100 options as shown in the example above. In other words:
...ab=128,channels=2,samplerate=44100...
Now, three more things worth mentioning:
- If you specify a range of titles, they may all be written into a single file as a continuous stream. This may not be what you want, which is why I would suggest working with one title at a time, i.e., ranges like 1-1, 2-2, etc.
- You can also use many other video and audio codec options, including potentially upscaling or downscaling the video as part of the process, which we will discuss separately.
- The GUI option is a bit cumbersome, so let's do the command line version, which we can script.
And basically, this is it. You can now let VLC do its magic and stream.
Command-line streaming & scripting
Now, here comes the funny bit. The streaming options, as outlined above in the GUI, do not work on the command line, either with the main VLC program (vlc) or even the GUI-less command-line version (cvlc). Try to invoke VLC with the options above, the command will simply fail. I was stumped by this, and went online, reading, searching. I couldn't find a SINGLE SOURCE that shows how to "translate" a VLC GUI command to CLI command, one that will stream from DVD with specific audio and subtitle tracks to a file. Not a single reference.
I spent a bunch of time, and through trial and error, I figured it out. So here's what you need to do to be able to stream any which (DVD) track to a file, with the correct audio settings. Now, I did this in Linux, but the functionality applies regardless. My example from above now reads:
/usr/bin/vlc -I dummy dvdsimple:///dev/sr0#1 \
--sout="#transcode{vcodec=h264,scale=Auto,acodec=mpga,ab=128,channels=2, \
samplerate=44100,soverlay}:file{dst=/home/igor/Videos/Test.mp4}" \
--no-sout-all \
--sout-keep \
--audio-track=1 \
--sub-track=2 \
vlc://quit
What do we have here?
Let me explain everything in detail, then:
- I use the dummy interface so there's no VLC window while transcoding.
- The source is DVD, with the starting position as track 1.
- The output option is specified with --sout rather than #sout as before.
- The transcode options need quotation marks.
- The same rules on line breaks and spaces apply in my code block above. Everything contained within the curly brackets for the transcode options need to be on a single line, with no whitespace characters.
- The remaining options, all specified with the : character in the GUI need -- now.
- The last command tells VLC to quit once done.
Therefore, the most generic command, which transcodes one DVD title at a time would be:
/usr/bin/vlc -I dummy dvdsimple:///dev/[device]#[title]-[title] \
--sout="#transcode{[transcode options],soverlay} \
:file{dst=[some file].[some container format]}" \
--no-sout-all \
--sout-keep \
--audio-track=[track number] \
--sub-track=[track number] \
vlc://quit
A more generic version, for any source, would be:
/usr/bin/vlc -I dummy [source] \
--sout="#transcode{[transcode options],soverlay} \
:file{dst=[some file].[some container format]}" \
--no-sout-all \
--sout-keep \
--audio-track=[track number] \
--sub-track=[track number] \
vlc://quit
If you do not want to use any subtitles, then replace soverlay with scodec=none. Also if you do not want to use any video or audio manipulation, and just stream the source as is, then your command will be just the subtitle element. Basically:
/usr/bin/vlc -I dummy [source] \
--sout="#transcode{scodec=none} \
:file{dst=[some file].[some container format]}" \
--no-sout-all \
--sout-keep \
--audio-track=[track number] \
--sub-track=[track number] \
vlc://quit
And now you can create say a simple loop that goes through each track as:
#!/bin/bash
for i in {1..N}
do
VLC LINE FROM ABOVE GOES HERE
done
exit 0
A simple practical example:
#!/bin/bash
for i in {1..7}
do
sleep 5
/usr/bin/vlc -I dummy dvdsimple:///dev/sr0#$i-$i \
--sout="#transcode{vcodec=h264,scale=Auto,acodec=mpga,ab=128,channels=2, \
samplerate=44100,soverlay}:file{dst=/home/igor/Videos/$i.mp4}" --no-sout-all \
--sout-keep --audio-track=1 --sub-track=2 vlc://quit
done
exit 0
I added a five-second pause between each iteration to make sure the destination files are written correctly and fully, and that everything works as it should. It's entirely optional, but it's not a bad thing, especially when working with "slow" media like the DVD.
Conclusion
Yes, in 2026, I encountered a wee issue that I never really considered before. Now, I'm very happy that VLC does the job. You have probably heard about many other wondrous media conversion programs, but really, you don't need them, if you're willing to learn a little about what happens under the hood. After all, VLC and ffmpeg cover 99% of your usecases. And you also get a lot of freedom in getting things done correctly. Since VLC is a cross-platform tool, you also gain on portability. Truly a wonderful media player.
Hopefully, this guide has helped you figure out the fine nuances between the GUI use and the CLI use, the differences between conversion and streaming, and how to automate the transcoding process. Now, let's talk briefly about ffmpeg. In reality, when you're editing videos with VLC, you are also using ffmpeg libraries in the backend. So, the question is then, what other sorts of wonders can one do if they need to convert or stream media? I had a wicked idea, well, how about upscaling and picture smoothing? In a follow-up tutorial, I will show you something rather clever. Stay tuned.
Cheers.