Installation of VMware Tools (only for virtual machines)
Includes important info about common installation problems & solutions
Note: This is a good exercise! You should read through, at the very least.
For more detailed instructions, please refer to the official Installing VMware Tools how-to, as well as the VMware/Tools Community Ubuntu Documentation.
In the File Menu of the VMware Server, choose VM > Install VMware Tools, OK the warning message. This will mount a virtual CD-ROM drive containing the VMware Tools binaries.

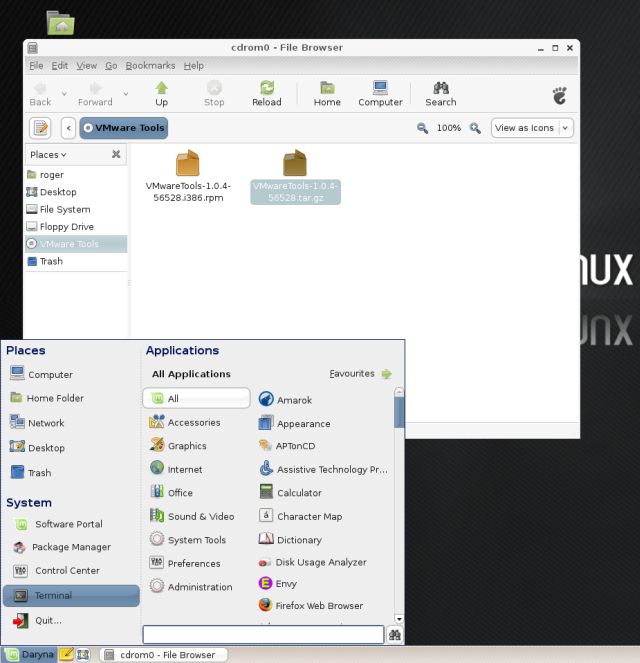
The virtual CD-ROM contains two files - one with the extension .rpm and the other with .tar.gz. The .rpm stands for RedHat Package Manager and is suitable for RedHat-based distributions. Since Linux Mint is Debian-based, this type of file is not suitable for us (instantly). Nevertheless, even if it were, we want to use the archive (.tar.gz.).
First, we need to extract it. This can be done via command line, as I have demonstrated in my Highly useful Linux commands & configurations article, but we'll do it using the GUI.
Right-click on the file > Extract-To...

Choose a destination.

After the archive has been extracted, we need to actually install the Tools. This must be done using the command line. First, we need to open a Terminal. The shortcut to Terminal can be easily found in the Menu, under System.
Once we hit the command line, we need to navigate to the directory containing the VMware Tools files. In the relevant directory, we need to locally execute the installation script (wizard). This can be done using the following command.
See below in the image; notice the geeky fortune.

The script is very simple and friendly. It asks questions, with default answers already selected. You will merely need to hit Enter several times - although you should read each step carefully.
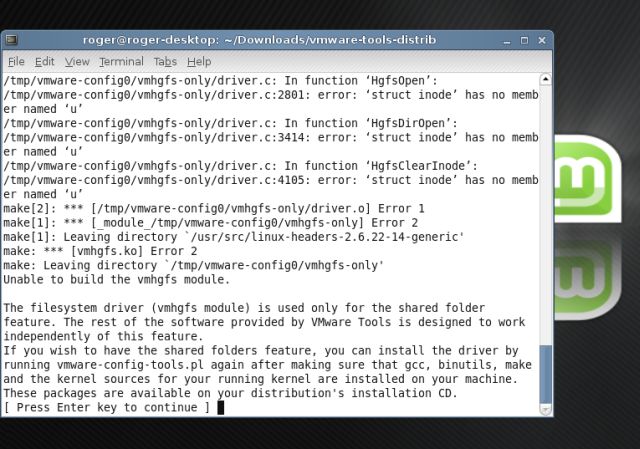
After several steps, you'll hit a snag. But don't worry, I led you there deliberately. The purpose of this step is to show you that even when your installation supposedly fails, the workaround is simple and fast.
The reason you see the error below is because the default Linux Mint installation does not come with all the packages needed for compilation of sources. We will install the missing packages and then repeat the installation of VMware Tools.
If you read carefully, you'll notice that the installer even tells you which packages are missing - gcc, binutils, make, and kernel sources - and where to find them, on the installation CD. This means that even if you don't have a working Internet connection, you'll be able to obtain them.
This is extremely important because in a real life situation, the missing modules might be the network adapters, for example. Luckily, you would have the sources on the CDs that came with your hardware. But your compilation would fail, for the same reason the installation of VMware Tools failed. Without a working Internet connection, you would not be able to find the sources using the Synaptic Package Manager. If they were not included on the CD, you would have been stuck.
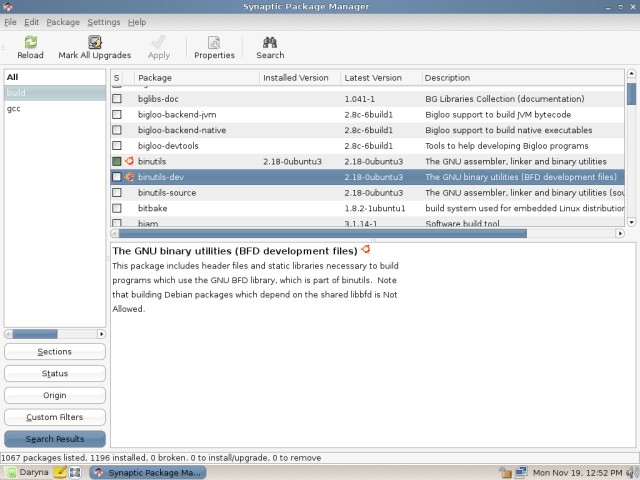
The missing tools can be found and installed using either the command line or the GUI. I'll show you both ways. First, we will launch Synaptic (System > Package Manager).

Next, we will search for the missing packages and mark them for installation. After you find the right packages, right-click > Mark for installation.


After all the packages are installed successfully, start the installation of VMware Tools again. This time, you should get no error messages and it should work.

You can simply restart the X session (Ctrl + Alt + Backspace) and the network service (sudo /etc/init.d/networking restart) for the relevant changes to take effect. Or if you feel uncomfortable, you can simply reboot the machine.
It is important to remember that the VMware Tools offer you to change the resolution. This is what we aimed for, among other things. Indeed, after you restart, you should enjoy the normal-sized desktop. Don't mind the lack of the bottom panel, I took the screenshot while the desktop was loading.

Now, we could have also installed all of the missing packages (gcc, binutils, make, kernel sources) with one simple command in the Terminal:
See in the image below:

This comes to show that the command line is often simpler and faster - and should not be feared! Lastly, you might want to setup the VMware Toolbox. This toolbox allows you to synchronize time, the clipboard and the mouse movement between the host and the guest. It will not run by default. You can manually invoke it - or add it to auto-start with the session.
Manually, just type in Terminal:
Alternatively, add the VMware Toolbox to your session. Click on Menu > Preferences > Sessions.

Under Startup Programs tab, you can see all the programs currently listed and enabled for all sessions. This is what we need. You can also configure your Current Session and general Session Options, but that's another subject.
Click Add to create a new Startup Program.

Now, give the new entry a Name (e.g. VMware Toolbox), the Command (path to command) and an optional Comment, which can help you (or others) understand what the program does.
The path to VMware Toolbox is /usr/bin/vmware-toolbox - unless you specified a different path during the installation.

Now, once you restart the machine or manually run the Toolbox, you will see the VMware Tools Properties window come up, with all the relevant options that can be setup. In order to enjoy the extras, you must keep the VMware Toolbox running (most likely minimized). Scripts and Shrink require root permissions.

Now, we're happy. So let's power up a browser and surf a bit.

You will notice that you cannot scroll up and down with the middle-mouse button. This is because the default VMware Tools installation configures the mouse device as a classic three-button mouse that does not have the scrollable middle mouse button. Let's change that.
Again, here's a good exercise in configuring system files and overcoming common installation problems. We will edit the configuration file for X Server - xorg.conf, which controls all aspects of the display - monitor, graphical drivers, mouse, and keyboard.

In the file, look for Identifier "Configured Mouse".
Under Option "Protocol" change whatever is written to "ExplorerPS/2". Save and exit. Restart the X session for the changes to take effect (Ctrl + Alt + Backspace).

And that's it! We have the VMware Tools fully configured and all the installation bugs ironed. This is a very good exercise, because it shows us how to:
- Not panic.
- Successfully perform a guided text installation from an archive.
- Troubleshoot compilation and installation problems.
- Troubleshoot post-installation problems.
- Edit system configuration files.
- Add new startup programs.
- Tweak the resolution and mouse settings.
- Use both the GUI and the command line to achieve desired results.
- Use the Package Manager to search and install packages.
Now, let's move on to the next page for some more post-installation fun.